How to Make a Music Video Without a Budget

The first no-budget video I made looked exactly like a no-budget video. Flat lighting, one angle, the artist standing slightly off-centre in someone's living room, glancing at the camera every few seconds. We'd spent four hours shooting 47 minutes of footage and used maybe 11 of them. Nobody watched it past the chorus.
The second one I made with zero money performed better than anything I'd worked on with a proper budget that year. The difference wasn't gear. It was that we went in with one clear visual idea and shot specifically for it.
Quick answer: a no-budget music video lives or dies on the concept, not the equipment. Pick one strong visual idea, one location, and a phone. The rest explains how to turn those three things into something people will actually watch.
One idea, not five
The most common mistake in no-budget production isn't bad camera work. It's trying to do too much.
A tight budget forces a choice. And the forced choice is usually the right one. The OK Go treadmill video — "Here It Goes Again," 2006 — won a Grammy and has over 80 million views. One room. Four treadmills. Choreography rehearsed 17 times before the final take. No edits. The picture quality is mediocre. Nobody cared. The concept did the work.
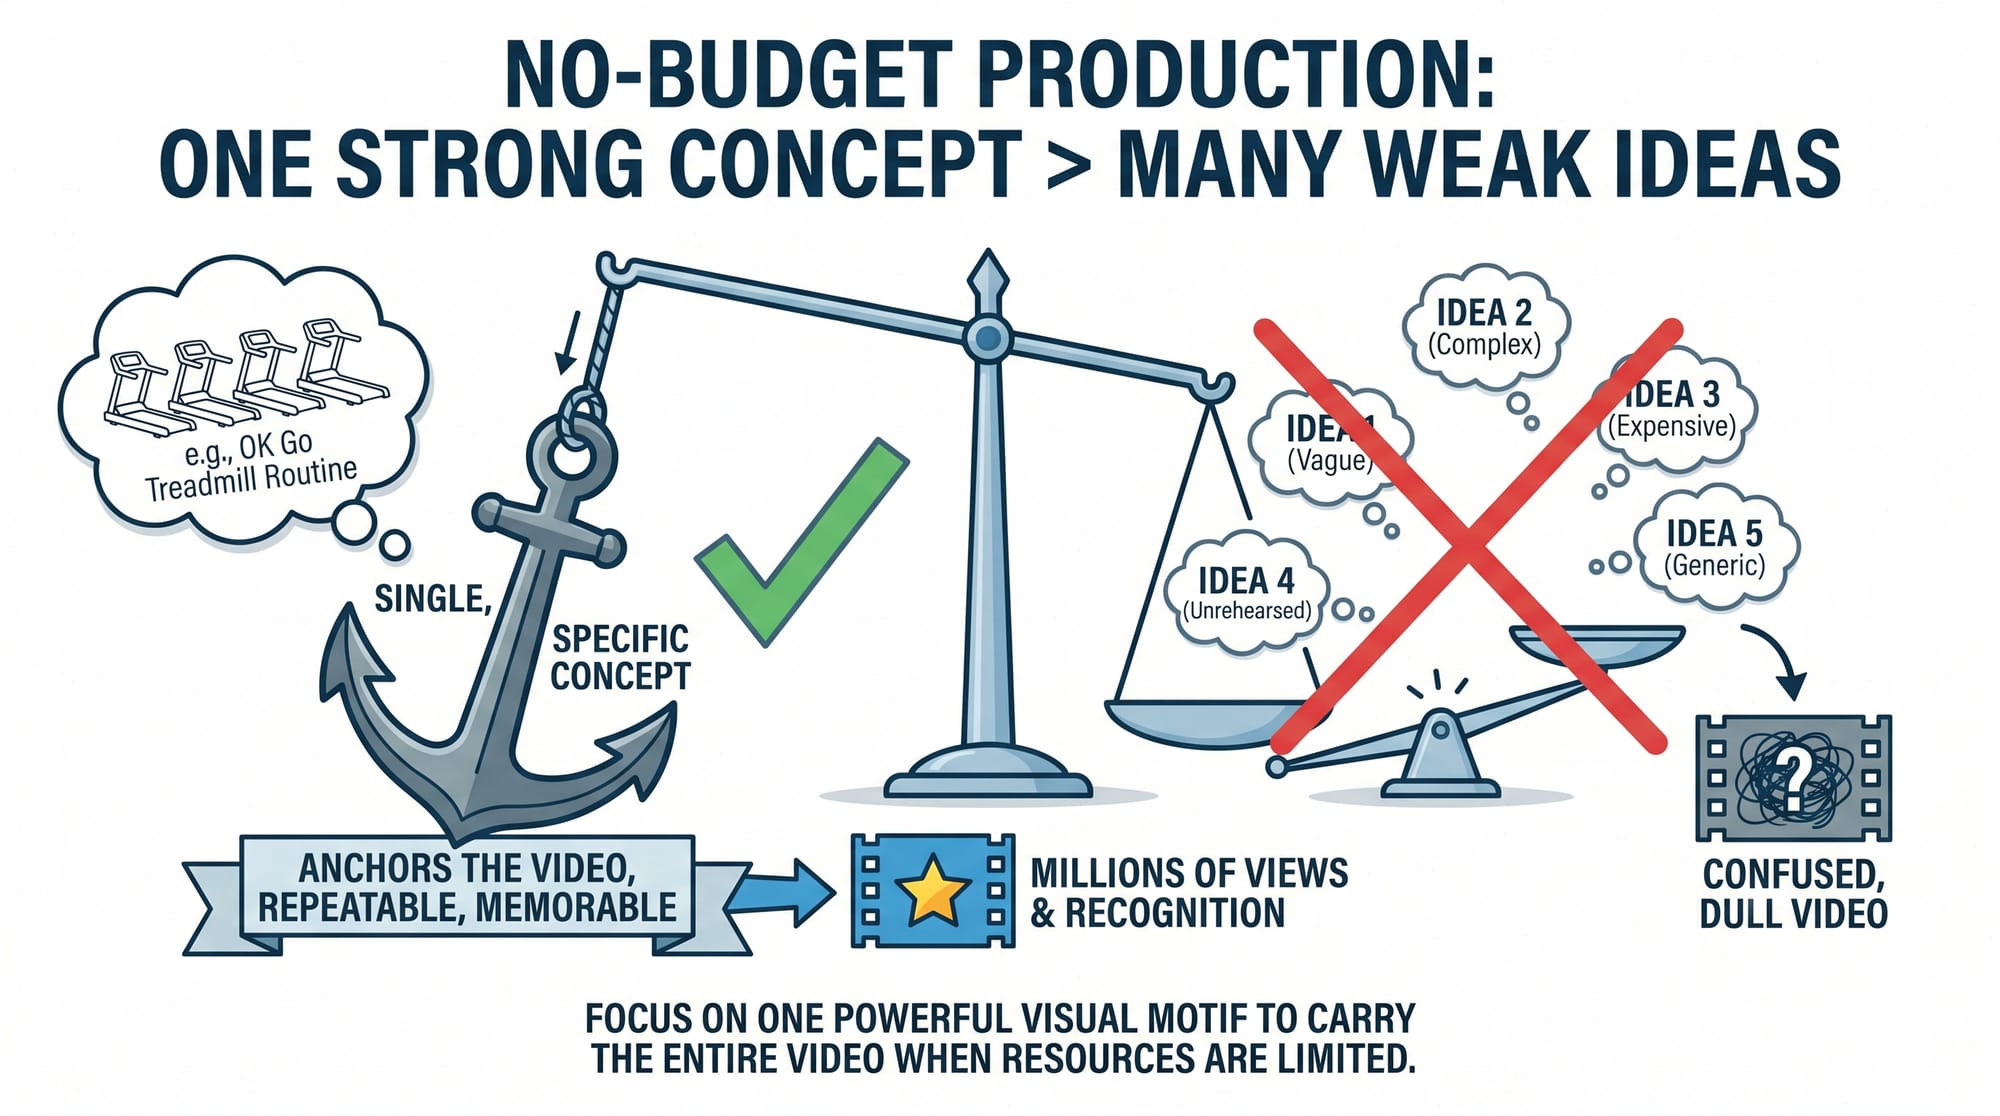
When you have no money, the concept is all you have. Which means it has to be specific enough to anchor the whole video — not "we'll figure it out on the day," but a single visual idea strong enough to repeat for three minutes without getting dull. A motif that carries the video by itself: a one-take walk through a location, a performance in front of a specific background, a simple physical action repeated rhythmically to the song.
On a no-budget shoot I directed last year, the concept was the artist mouthing the lyrics in reverse while the footage played backwards. Total gear cost: zero. Planning time before the shoot: 3 hours of the artist memorising the reversed phonetics. When we cut the footage it looked deliberate and strange in a way that cost nothing and looked like nothing else in their genre that week. Specific idea beats scattered production every time.
Location is your production value
A bad location on an expensive camera looks like a bad location. A great location on a phone looks like a video.
When there's no budget for lighting rigs, set dressing, or permits, the location is the only visual environment you have. Choose it based on three things: natural light, visual depth, and access.
Natural light is your entire lighting department for free. Golden hour — the 45 minutes after sunrise and before sunset — gives directional, warm, soft light that cinematographers spend thousands recreating artificially. Schedule your shoot around it. If golden hour isn't available, find open shade: under a tree, in a doorway, on the shadow side of a building. Midday direct sun is the worst condition for a no-budget shoot — harsh shadows, blown highlights, flat faces that no grade fixes.
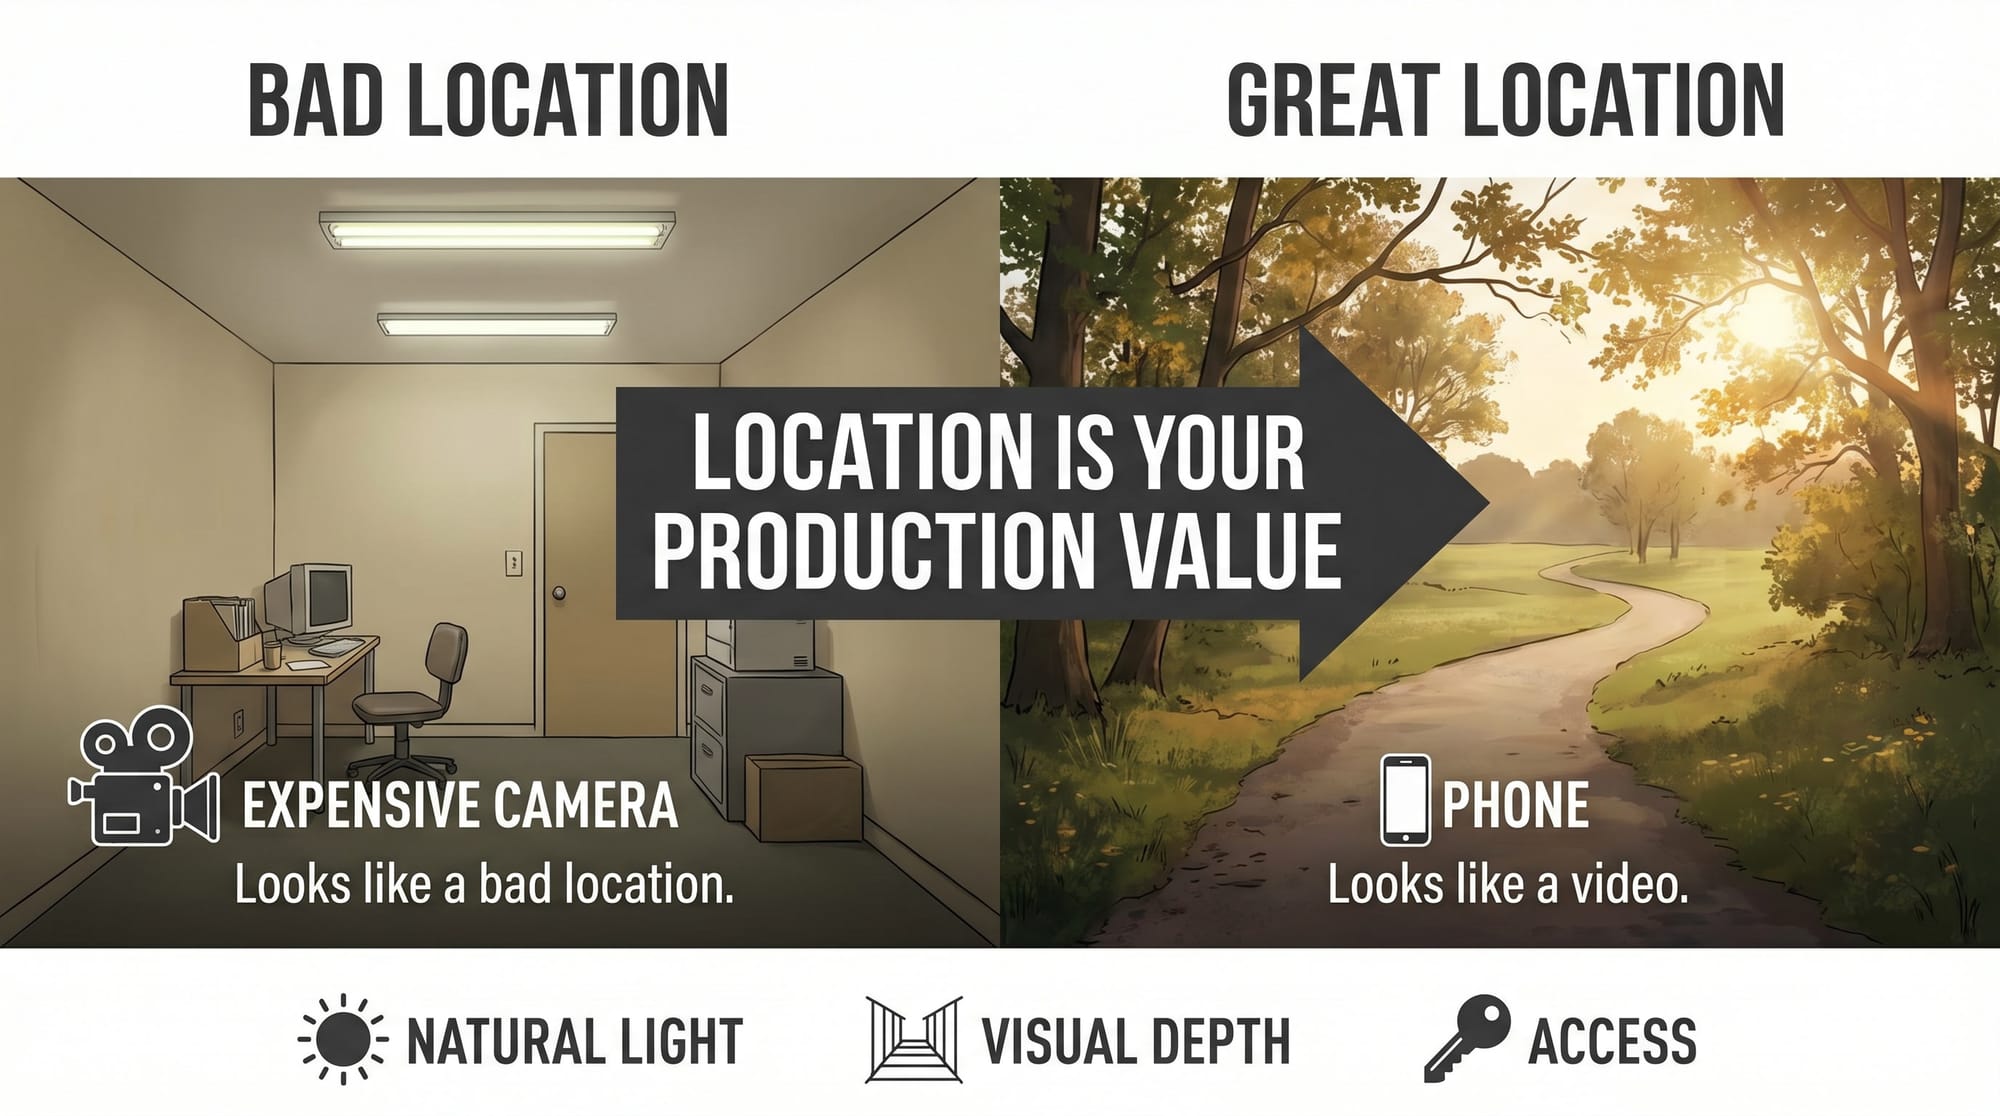
Visual depth means something behind the subject, not a flat wall. A street stretching into the distance, a doorway with a hallway behind it, buildings or trees in the background. Depth makes a phone look more expensive. A flat background makes an expensive camera look cheap.
Access means somewhere you can stay for three to four hours without getting moved on. Your own space, a friend's location, a park you know well, an industrial area you've scouted in advance. Being chased off a location 45 minutes in costs more than any gear rental.
On a recent no-budget shoot I found a multi-storey car park at 6am. Completely empty, concrete columns, warm morning light cutting through the levels. Shot the whole video there in 3 hours. Nobody asked us to leave. The location did more visual work than anything we could have built.
Your phone is fine — if you lock the settings
A recent iPhone or Android flagship shoots in formats that grade well, stabilise handheld movement acceptably, and hold up at 4K. The phone is not the limiting factor on a no-budget shoot.
Lock your settings manually before every setup — this is what separates usable phone footage from footage that looks like a phone. Auto white balance drifts between takes. Auto exposure adjusts as clouds pass and kills shot consistency. On iPhone: tap and hold in the native camera app to lock exposure, enable Lock White Balance in Settings → Camera → Record Video, set frame rate to 4K 24fps. On Android: switch to Pro video mode, set ISO manually, lock white balance at 5600K for daylight or 3200K for indoor tungsten.

I've had takes ruined on a no-budget day because I forgot to lock white balance between setups — the first and last take of the same setup were visibly different temperatures. It costs two seconds to lock it and an hour to fix it in the grade.
For focus on performance shots where the artist is moving: face detection AF on a recent iPhone or any Android flagship with a competent autofocus system tracks faces reliably enough that you can perform and stay in focus simultaneously. On older phones without reliable face detection, stand far enough back that the depth of field covers normal performance movement.
One thing that lifts phone footage immediately: a tripod. Handheld phone footage reads as amateur faster than handheld footage from a dedicated camera because the phone's stabilisation has a specific floating quality that's visually different from optical stabilisation. A $15 mount changes this. More on full phone settings: Best Camera Settings for Music Videos →
Shoot the performance to playback, not silence
This is the detail that separates usable footage from footage nobody can cut.
The artist needs to hear the track while performing. Not through earphones in one ear — through a speaker loud enough that the performance is a real performance, not a mime in a quiet room. When you can hear the track you respond to it. The lip sync looks connected. The energy has somewhere to come from.
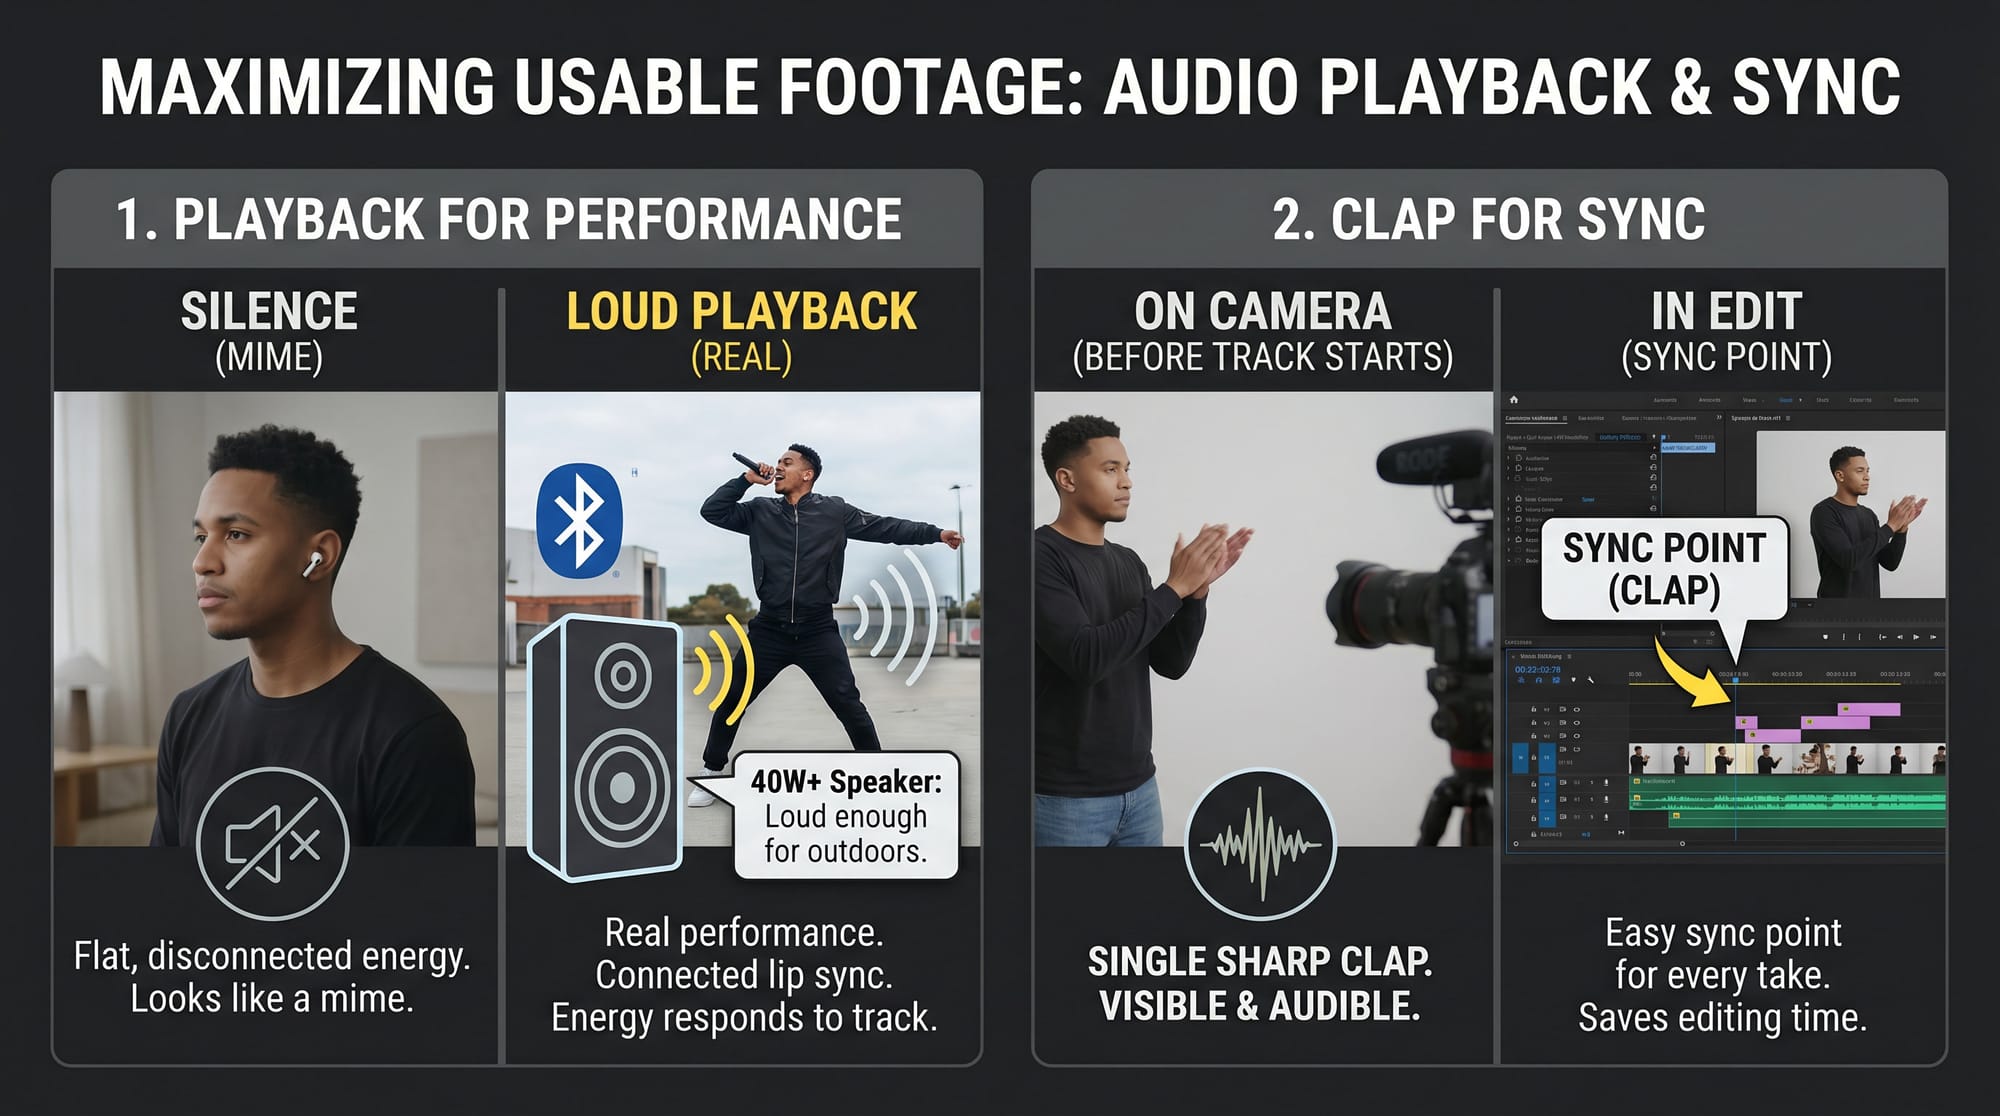
I borrowed a 40W Bluetooth speaker specifically for no-budget shoots because it's loud enough to fill outdoor locations without the artist having to strain toward it. Anything smaller starts to show in the performance — there's a particular flatness in lip sync footage where the artist clearly can't hear the track properly, and it shows in every take.
Clap once clearly on camera at the start of every take before the track starts — a single sharp clap, visible from every angle you're shooting. This gives you a sync point in the edit for every take without needing timecode. Without it, syncing takes to the master audio wastes time you don't have. More on the full sync workflow: How to Sync Multiple Camera Angles →
Plan it on paper before you arrive
The most expensive thing on a no-budget shoot is indecision. Every minute figuring out what to shoot next is golden hour burning out, or battery dying, or the artist's energy dropping.
A shot list doesn't require drawing skills. A note on your phone: 15–20 shots, in order, with angle (close/medium/wide) and what's happening in each. Write it before the shoot day. Walk the location before the shoot day if possible, at the same time of day you're planning to shoot, to see exactly where the light falls. I've shown up to locations I thought I knew and found the light completely different from what I expected — 30 minutes of pre-scout saves 90 minutes of confusion on the day.
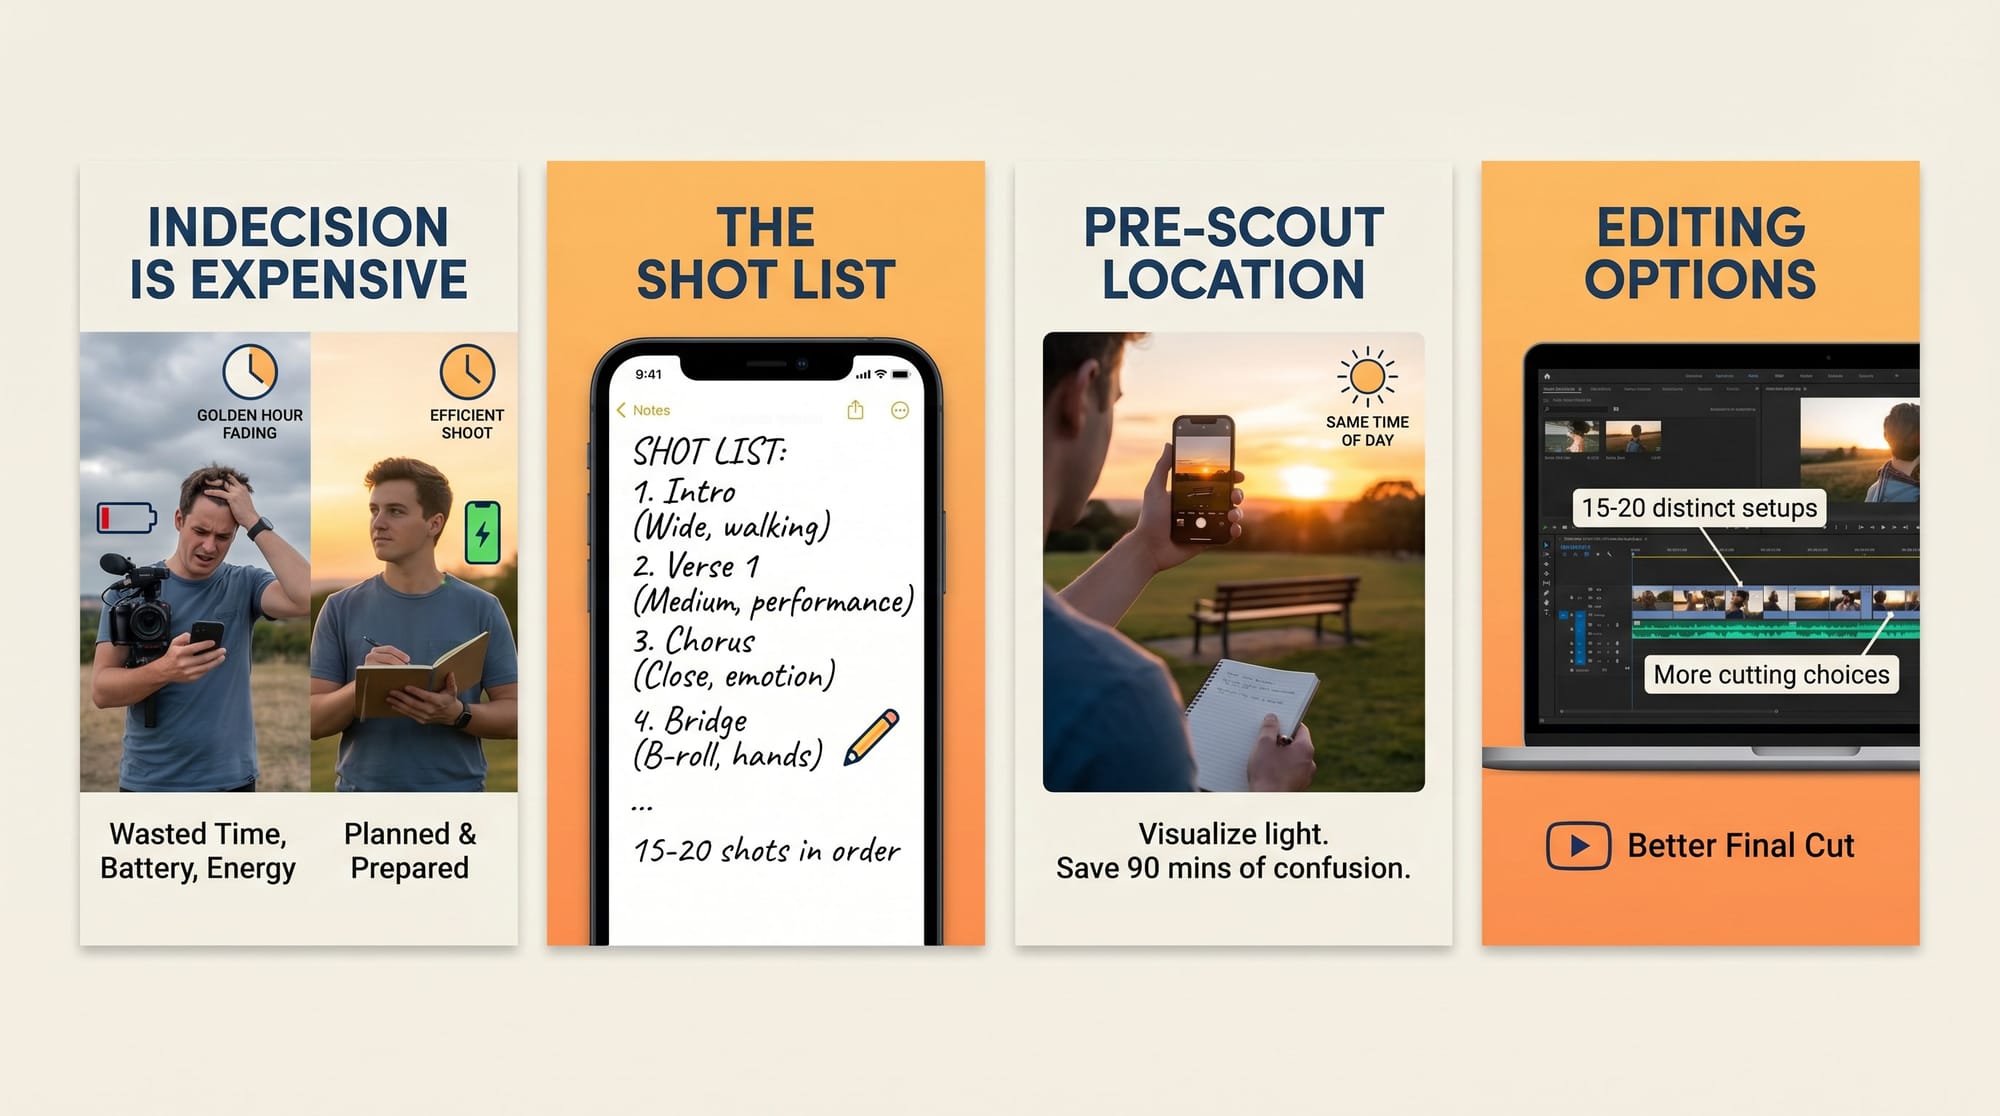
At a pace of one setup every 12–15 minutes — realistic for a two-person phone shoot — 15–20 setups is a three to four hour day. Write the list, get everything on it before improvising. For a three-minute song at one location you need roughly 15–20 distinct shots to have real cutting options. That's not many. Plan them specifically and you'll have more than you need. More on solo shoot logistics: How to Shoot a Music Video Alone (No Crew) →
Edit what you shot, not what you wish you'd shot
No-budget footage has coverage gaps. A shot that looked good on the phone screen at the location looks soft or slightly wrong when you open it on a desktop. This is normal. The edit works around it.
Cutting on the beat covers almost any gap. If the cut lands exactly on a hit — snare, kick, the first syllable of a lyric — the eye reads it as intentional even when the angles don't match perfectly. A slightly soft shot that cuts precisely on the beat looks better than a sharp shot that lands half a beat late. I've salvaged entire sequences this way — the timing did the work the footage couldn't.
Close-ups of details fill everything else: hands, the artist's face at an angle, an object in the environment. Easy to shoot at any point during the day while the camera is already positioned. They bridge angles that don't match, cover mistakes, and add visual texture. Shoot 8–10 close-ups of random details at each location. They cost nothing and save the edit every time.
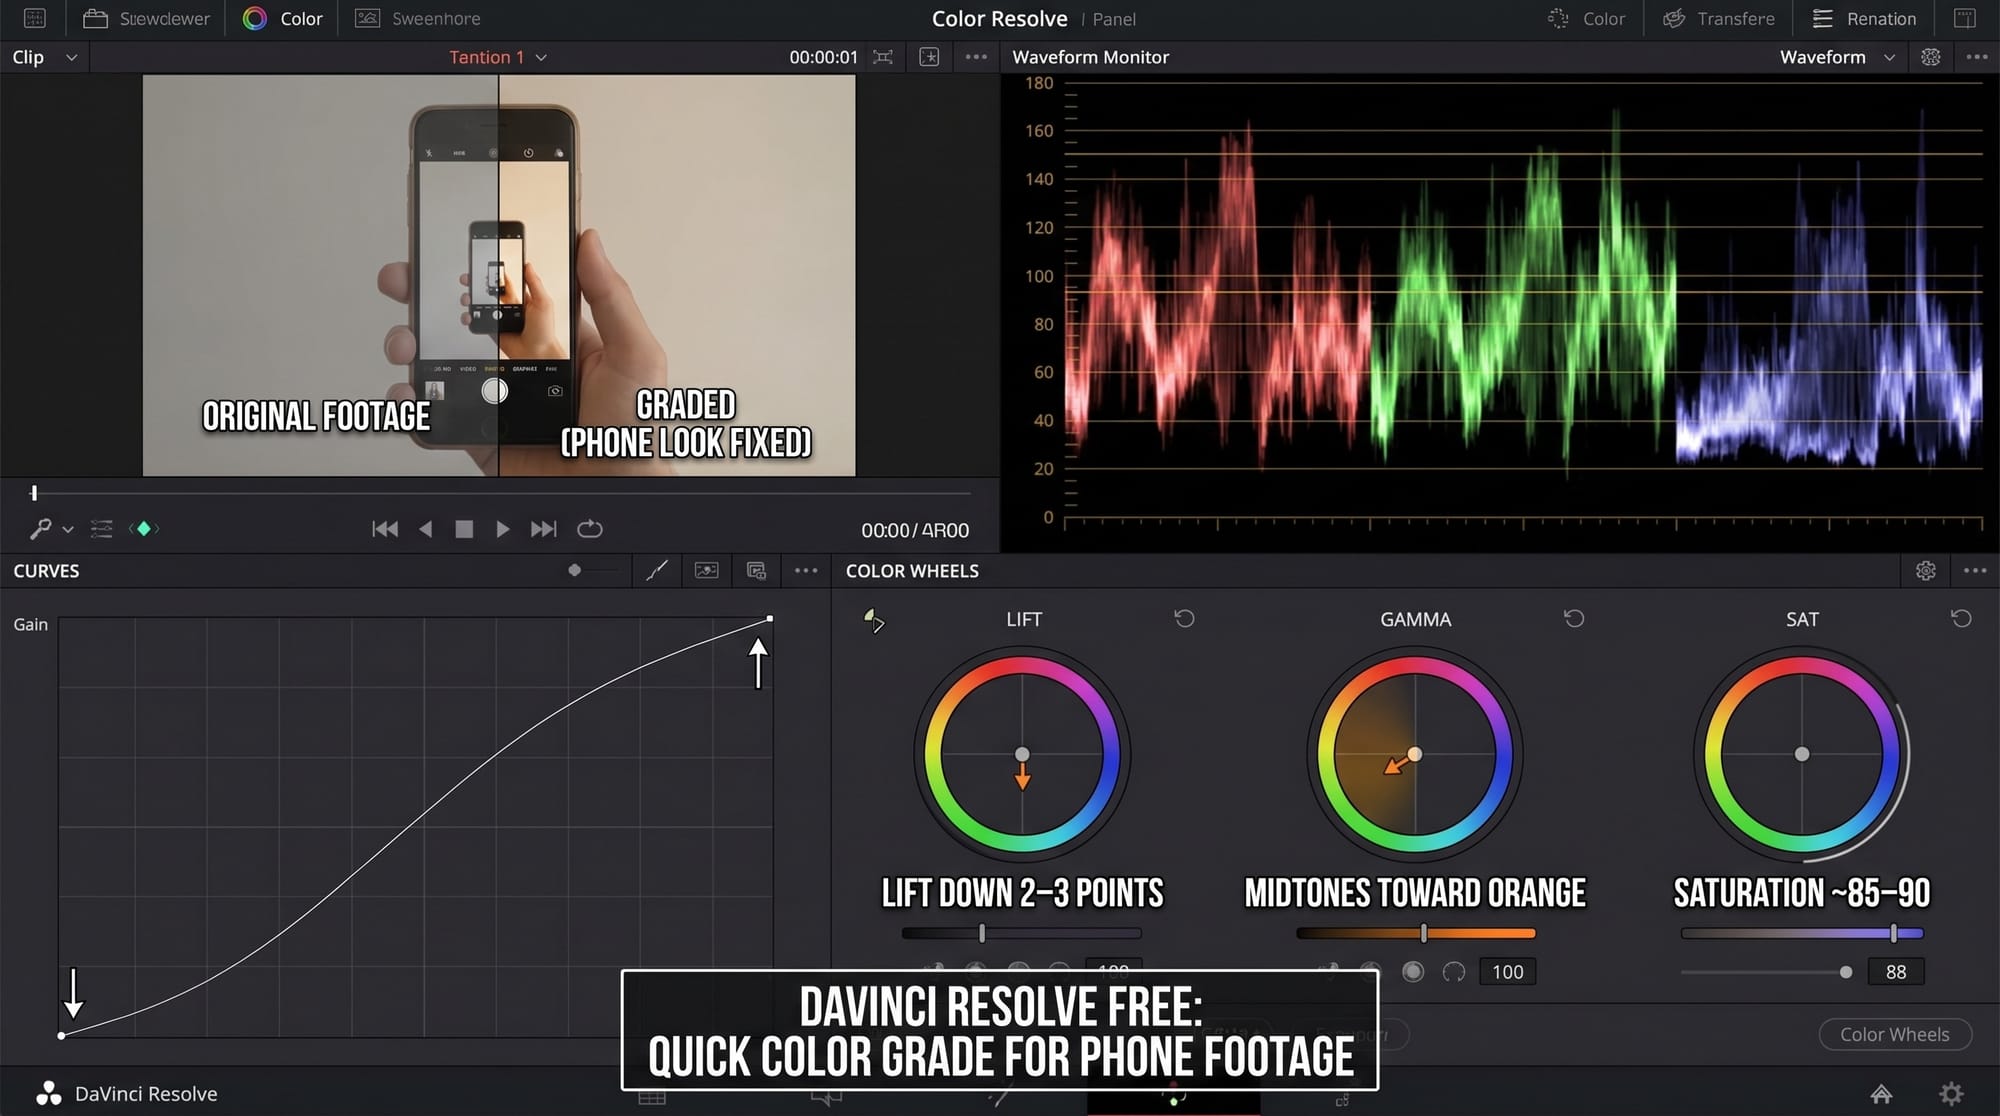
For the colour grade in DaVinci Resolve free: pull lift down 2–3 points, gentle S-curve, saturation to around 85–90, push midtones 3–5 points toward orange. This takes phone footage out of "phone footage" territory without overcooking it. More on colour grading for different platforms: How to Colour Grade for Social Media → For the full picture on editing on phone vs desktop: Video Editing on Phone vs Desktop →
No-budget video ideas that actually work
Not every concept suits zero budget. These do.
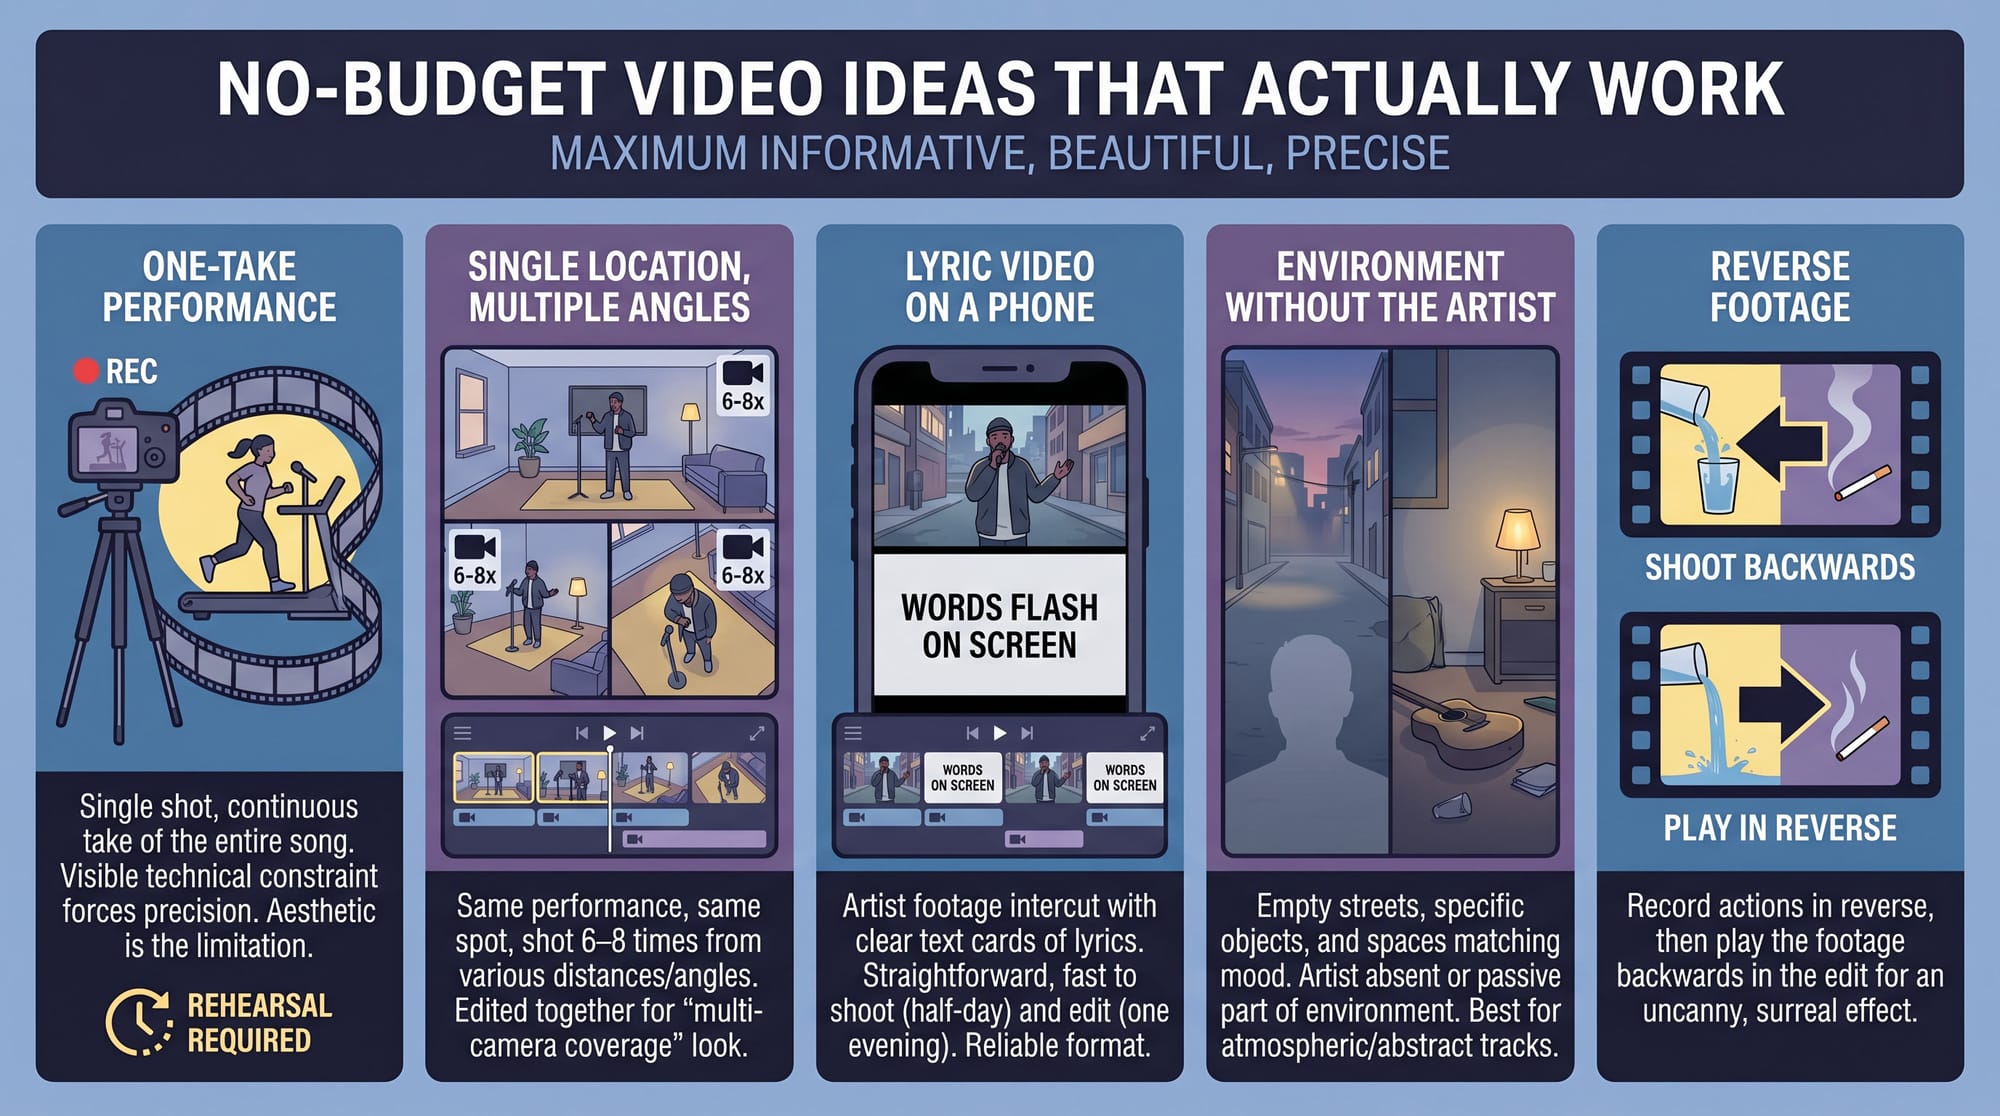
One-take performance. Lock the camera, press record, the artist performs the whole song. Needs rehearsal — this is not the easy option — but the technical limitation becomes the aesthetic. What makes OK Go's treadmill video work is that the constraint is visible and the execution is precise. One take forces specificity.
Single location, multiple angles. Same location, same performance, shot from 6–8 different distances and angles across the day. In the edit these become apparent multi-camera coverage. Looks more produced than it was.
Lyric video on a phone. Footage of the artist in a location intercut with text cards showing the lyrics. Straightforward, works for any genre, takes half a day to shoot and one evening to edit. One of the most reliably watchable formats on YouTube at no budget.
Environment without the artist. Empty streets, a specific neighbourhood, objects and spaces that match the mood of the song — shot with the artist not present, or present but as part of the environment rather than performing. Works especially well for abstract or atmospheric tracks.
Reverse footage. Shoot everything backwards, then reverse in edit. The lip sync looks intentional and strange. Requires the artist to memorise the song reversed phonetically, which takes time but costs nothing.
FAQ
How can I make my own music video for free? Phone, tripod ($15–30), loud speaker for playback, one location, DaVinci Resolve free for editing. Everything required is already in your pocket or costs under $30 total. The cost is time — planning, rehearsal, shoot day, edit. A realistic schedule: concept and shot list in one evening, location scout in 30 minutes, shoot day 3–4 hours, edit 3–6 hours.
How much does a music video cost? Professional videos start around $5,000–$10,000 for modest productions and run into six figures for major label releases. A no-budget video costs whatever you already own plus time. The gap in output quality is smaller than most people expect when the concept is specific and the light is right.
How do I make a music video by myself? Locked-off tripod, face detection autofocus, loud speaker for playback, clap at the start of each take for sync, detailed shot list so you're not improvising. Lock white balance and frame rate before each setup. Full solo shoot workflow: How to Shoot a Music Video Alone (No Crew) →
How to make a music video cheap? One location instead of several. Phone instead of camera rental. Natural light instead of a lighting kit. Friends instead of a crew. DaVinci Resolve free instead of a paid editor or colorist. The consistent pattern in cheap videos that look good: strong concept, correct light, locked settings, specific shot list.
What makes a low-budget music video look cheap? Bad light, no concept, auto white balance drifting between takes, too many locations shot badly. A video that tries to cover five locations inadequately looks cheaper than one that commits fully to a single location shot well. The other consistent marker: the artist clearly can't hear the playback track, and the disconnected energy shows in every take.
Can I shoot a music video indoors for free? Yes. Face the artist toward a large window — the window acts as a large soft key light. The bigger the window, the softer the light. Put white foamboard ($3 at a craft shop) opposite the window to fill shadows on the other side. This is a technique used on actual productions. It costs three dollars.
How do I make a music video at home without equipment? Phone in 4K 24fps with settings locked manually. Tripod or phone leaned against a stack of books — anything that removes handheld float. A window for light. A Bluetooth speaker for playback. That's the full equipment list. Everything beyond this adds refinement, not possibility.
How to make a music video without a budget on YouTube? Shoot, edit, export at 4K in DaVinci Resolve free, upload as unlisted first to check quality and sync, then publish. Title and thumbnail matter more than production value at the point of discovery — a video with a clear thumbnail and a specific title gets found; a beautifully shot video with a vague title doesn't. Promote through your existing channels on post day, tag consistently with the song title and artist name.