How to Edit Videos Faster: 10 Workflow Hacks
The edit that takes four hours and the edit that takes eight hours are usually the same length of video. The difference is almost never how fast someone can move a mouse. It's everything that happens before the timeline opens — and the habits that run on autopilot once it does.
I've found that most of the time I lose in an edit isn't in the cutting. It's in searching for a clip I know I have but can't find, re-doing something I've done a hundred times because I didn't save it as a preset, or waiting for my machine to catch up to me because I'm working on proxy-free 4K on a laptop. None of that is editing. All of it is fixable.
1. Learn J-K-L — actually learn it
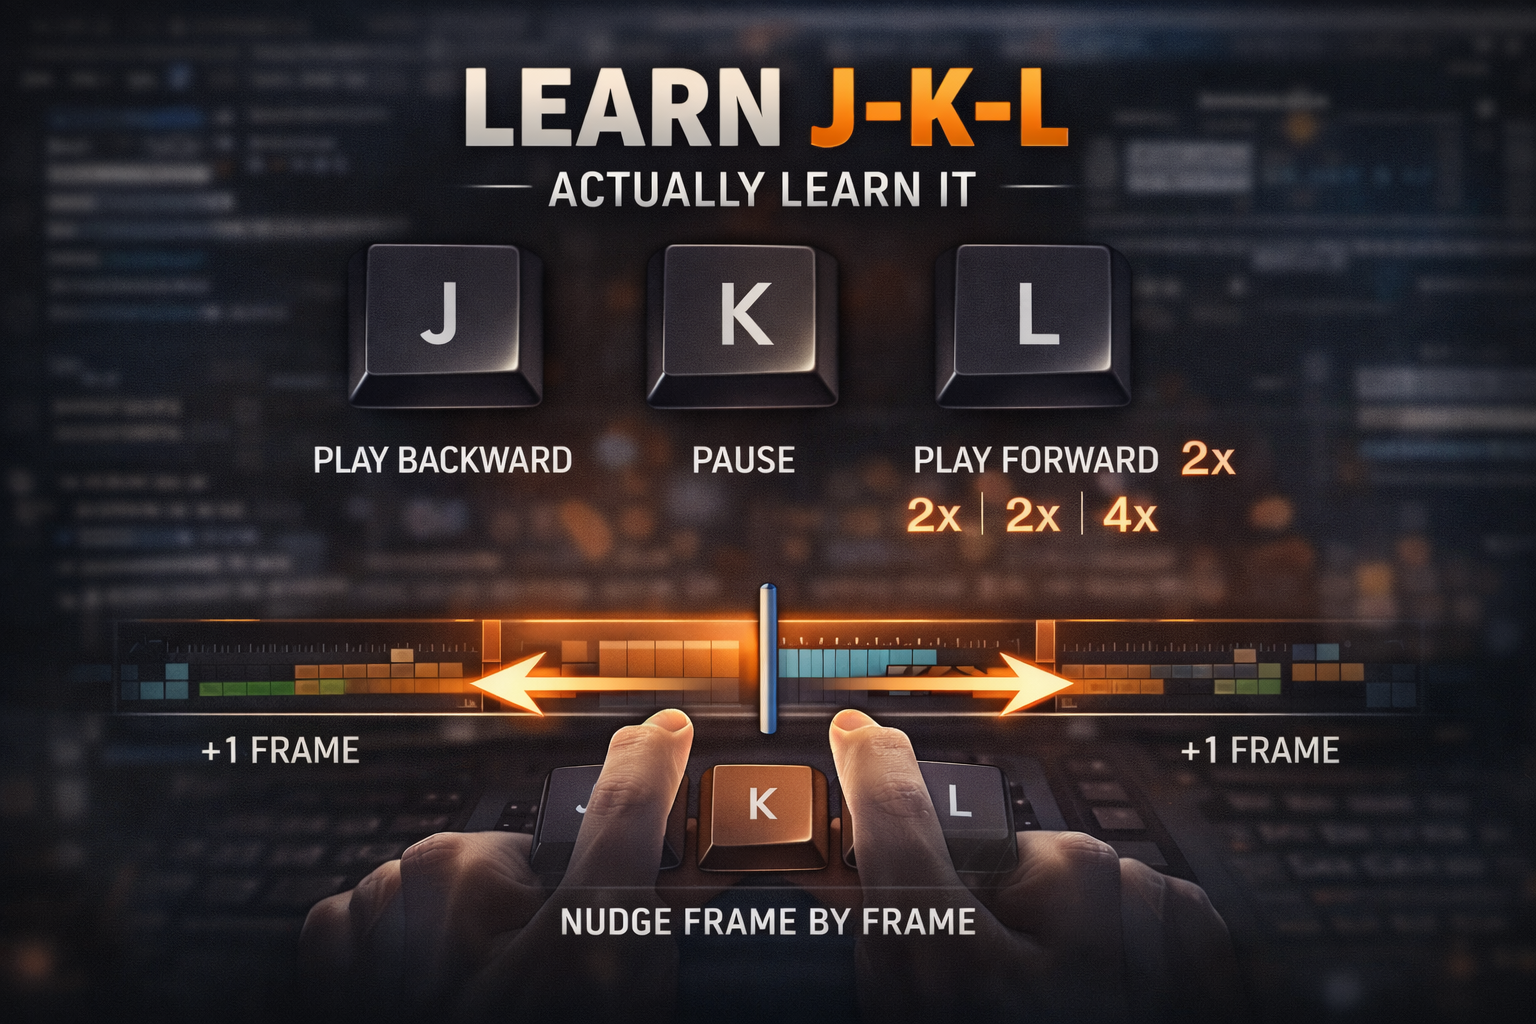
Most editors know Cmd+K or Ctrl+K to cut at the playhead. That's table stakes. The shortcuts that actually change edit speed are the ones you use constantly but haven't bothered to learn yet.
J-K-L playback is the one I'd start with. L plays forward, K pauses, J plays backward. Tap L twice for 2x speed, three times for 4x. Hold K and tap J or L to nudge frame by frame. Once this is in muscle memory you never reach for the play button again — and you stop losing your place in the timeline every time you do.
Ripple delete is the other one. When you cut a clip out of the timeline, you want the gap to close automatically. In Premiere: Shift+Delete. In DaVinci Resolve: Backspace on the cut clip. In Final Cut: Delete. Without ripple delete you're closing gaps manually after every single cut. On a ten-minute timeline that's dozens of extra clicks. On a thirty-minute interview it's closer to a hundred.
In/Out points: I and O. Mark your in-point, mark your out-point, drop the clip to the timeline with a single keystroke. No scrubbing the full clip to find the usable section.
Pick two of these you don't currently use and force yourself to use only the keyboard for one full edit. It's slower that day. It's faster permanently after.
2. Use proxy files for anything above 1080p

Editing 4K on a machine that wasn't purpose-built for it — or even one that was — creates a specific kind of friction: you make a decision, then you wait. You make another decision, then you wait. The waiting compounds. By hour three you're spending more time watching the spinning wheel than making cuts.
Proxy files solve this. A proxy is a lower-resolution copy of your footage that the editor uses during the cut. On export, the software swaps back to the full-resolution originals. You get the output quality without the performance hit during the edit.
In DaVinci Resolve: right-click your clips in the media pool → Generate Optimized Media. Set resolution to something your machine handles smoothly — usually 1080p or 720p. Per Blackmagic Design's documentation, optimised media can be set to generate automatically on import via preferences.
In Premiere Pro: right-click clips in the Project panel → Proxy → Create Proxies. Toggle on/off with the Proxy button in the Program Monitor. Full walkthrough in Adobe's official Premiere documentation.
In CapCut desktop: Settings → Performance → enable Proxy Mode. Leave it on permanently.
Proxies feel like extra setup the first time. After the first edit where you don't sit watching a spinning wheel, you won't skip them again.
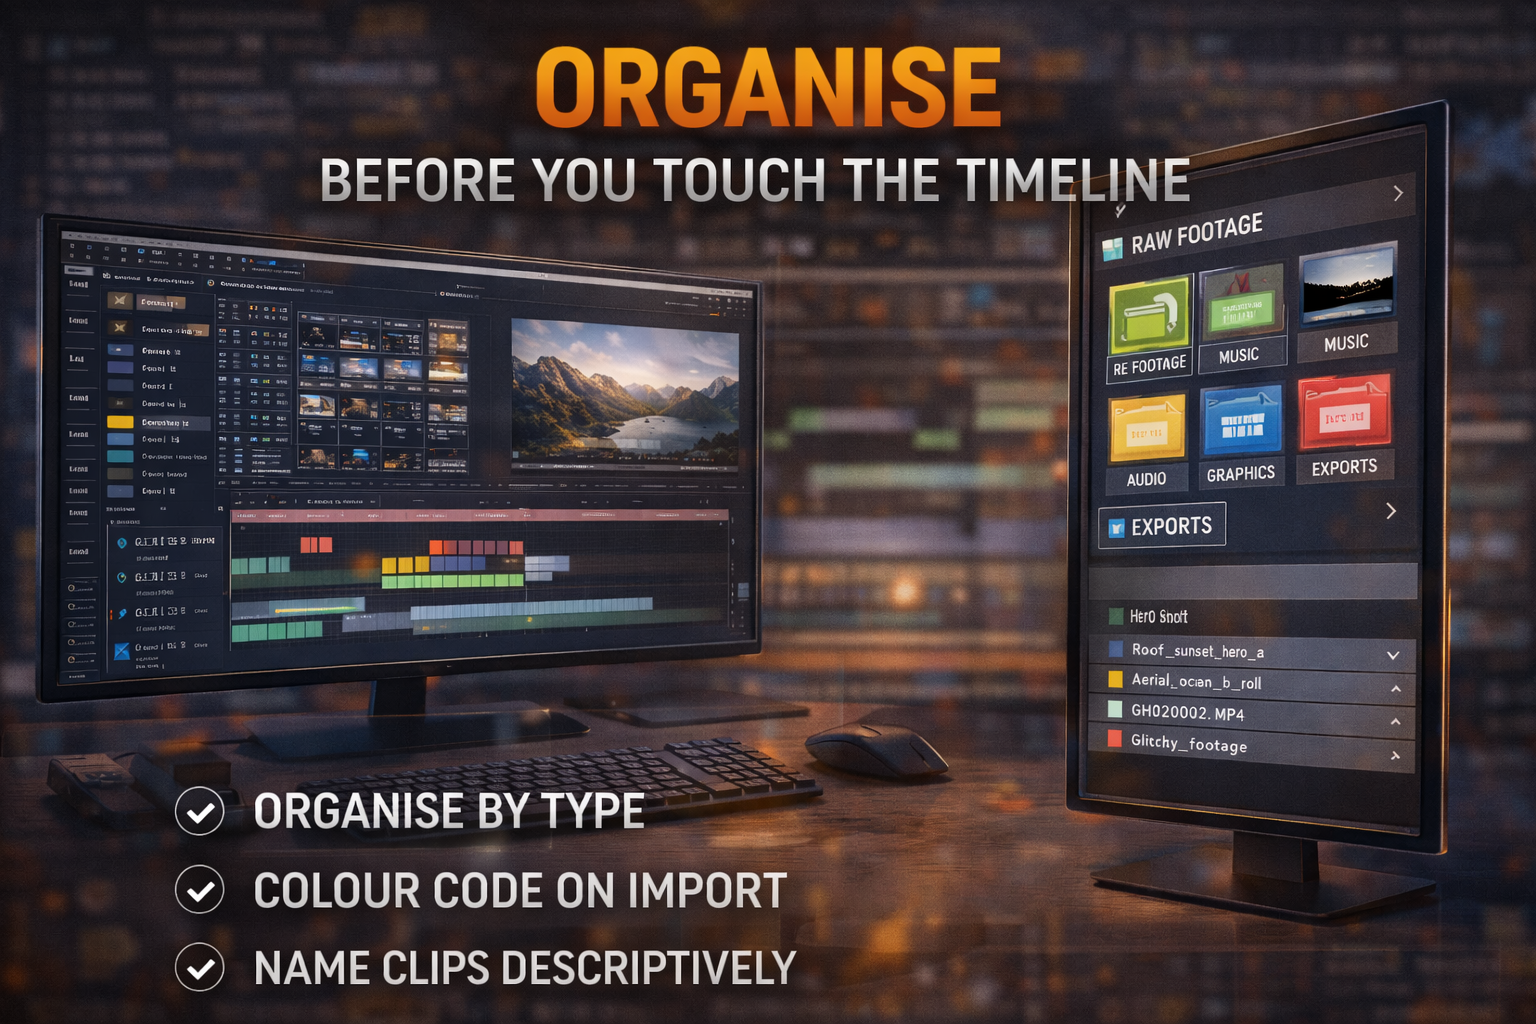
3. Organise before you touch the timeline
An editor who runs veedyou.com described his second monitor setup: wide monitor for the timeline, smaller vertical monitor for media bins, effects, and sequences. Not one editor I've seen work fast does it with everything on a single screen in overlapping panels. The time lost switching between windows adds up invisibly.
Even without a second monitor, project organisation does the same job. The structure that works:
Bins by type, not by clip name: Raw Footage, Audio, Music, Graphics, Exports. So you know instantly where to look for anything.
Colour labels on import: green for hero shots, yellow for usable B-roll, red for compromised footage that might still be useful. Three minutes labelling on import saves ten minutes second-guessing in the timeline.
Name clips before they hit the timeline: "GH010234.MP4" tells you nothing. "Roof_sunset_hero_a" tells you exactly what you're working with. Thirty seconds to rename. Saves minutes of scrubbing every time you need to find that clip again.
A clean project is a fast project. Disorganised bins mean the decisions you should spend on the edit go on finding things instead.
4. Build a template project and duplicate it
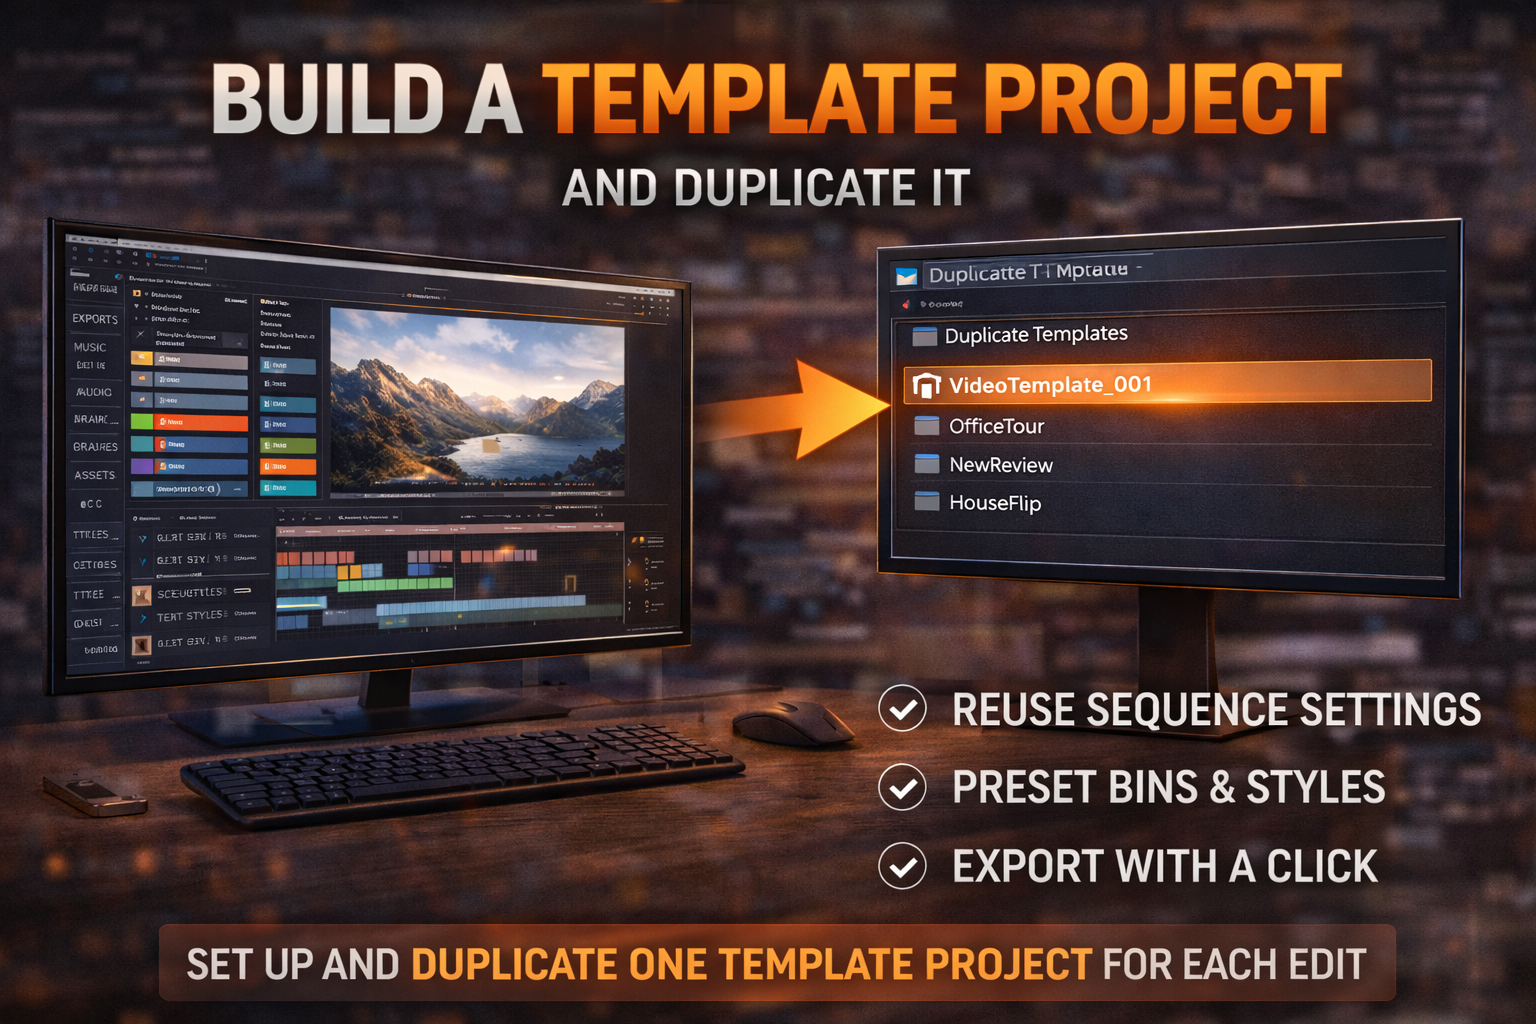
Every time you start from a blank project, you rebuild things you've already built. Sequence settings, text styles, export presets, bin structure.
In Premiere Pro: build one project with your sequence settings, bins, and recurring elements. File → Save a Copy for each new edit.
In DaVinci Resolve: right-click the project in the Project Manager → Clone Project. You get everything — timeline settings, colour nodes, output presets — ready to go.
In CapCut desktop: duplicate a previous project and delete the footage, keeping text styles, colour adjustments, and layout.
This is especially valuable for recurring short-form content. If you post weekly Reels with a consistent look, your caption style, colour grade, and outro should be inherited for free on every video rather than rebuilt.
5. Edit in passes, not one continuous sweep
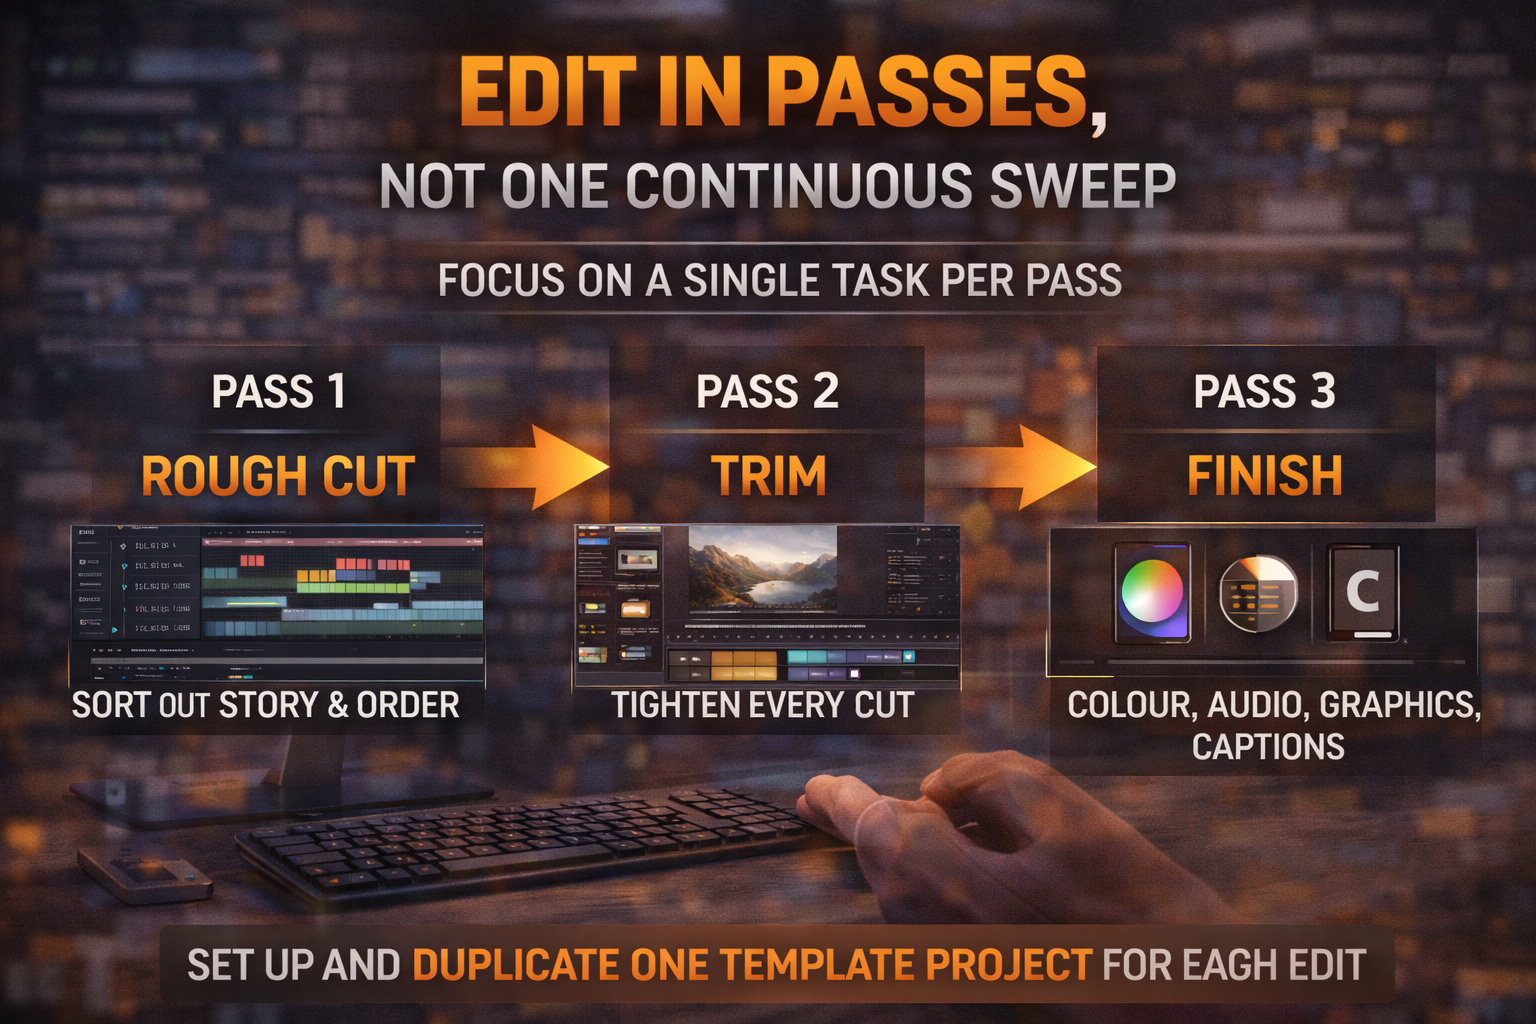
The single biggest source of slow edits: trying to do everything at once. Cutting footage while watching colour, while thinking about music, while wondering if the caption font is right. None of these tasks gets done well and all of them slow each other down.
Separate the edit into distinct passes:
Pass 1 — rough cut. Get clips in the right order at roughly the right length. Don't touch colour, audio levels, or graphics. Just get the story right.
Pass 2 — trim. Go through every cut and tighten it. Remove dead air, cut the pauses, fix the handles. This is where you decide final clip lengths.
Pass 3 — everything else. Colour, audio, graphics, captions, transitions — in that order. Colour before audio because colour decisions can change what you hear. Both before graphics because graphics sit on top.
One full-time editor described going from four-hour edits to under two by separating these phases. The cutting decisions are faster when you're only thinking about cuts. The colour decisions are faster when the structure is locked and you're only thinking about colour.
6. Drop a marker instead of stopping
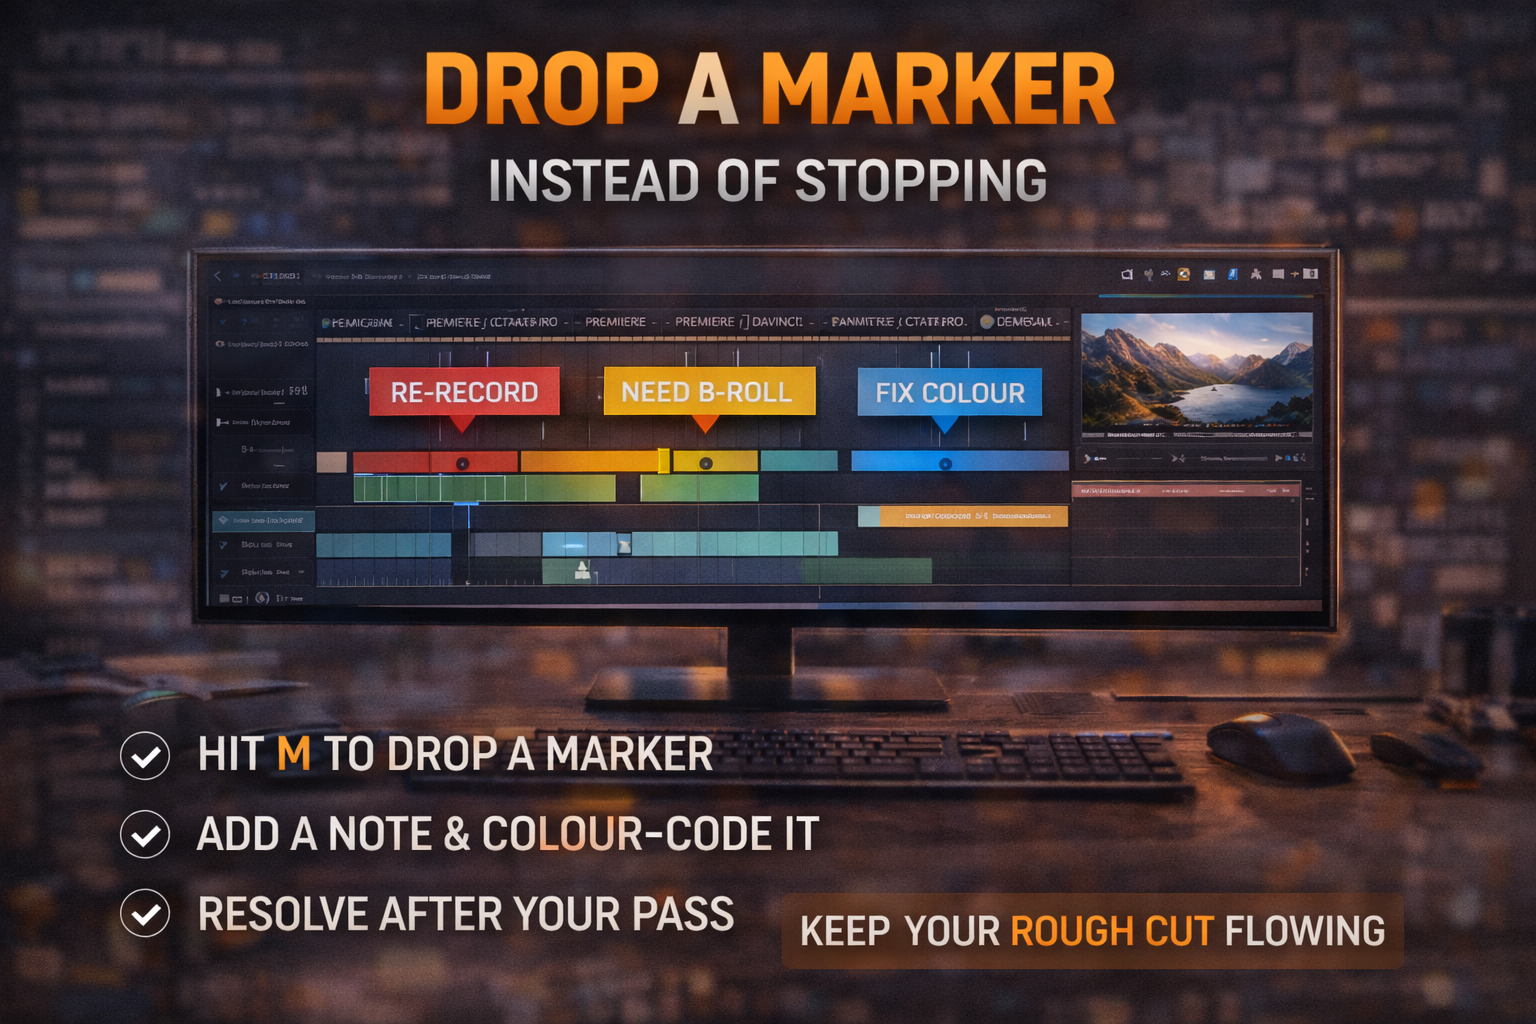
You're moving through the timeline in a decent rhythm and you spot something that needs fixing — a line that needs re-recording, a section where you need B-roll, one clip with a colour problem. The instinct is to stop and fix it now.
Don't. Mark it and keep moving.
Hit M to drop a marker in Premiere, DaVinci, and Final Cut. Add a short note if needed. Colour-code it: red for audio issues, yellow for B-roll needed, blue for colour. Keep moving through the rough cut.
At the end of the pass, resolve all markers in sequence. This is faster than stopping and starting constantly — and it prevents the problem where fixing one thing mid-cut breaks something nearby before you've even finished the rough structure.
7. Save presets for everything you repeat
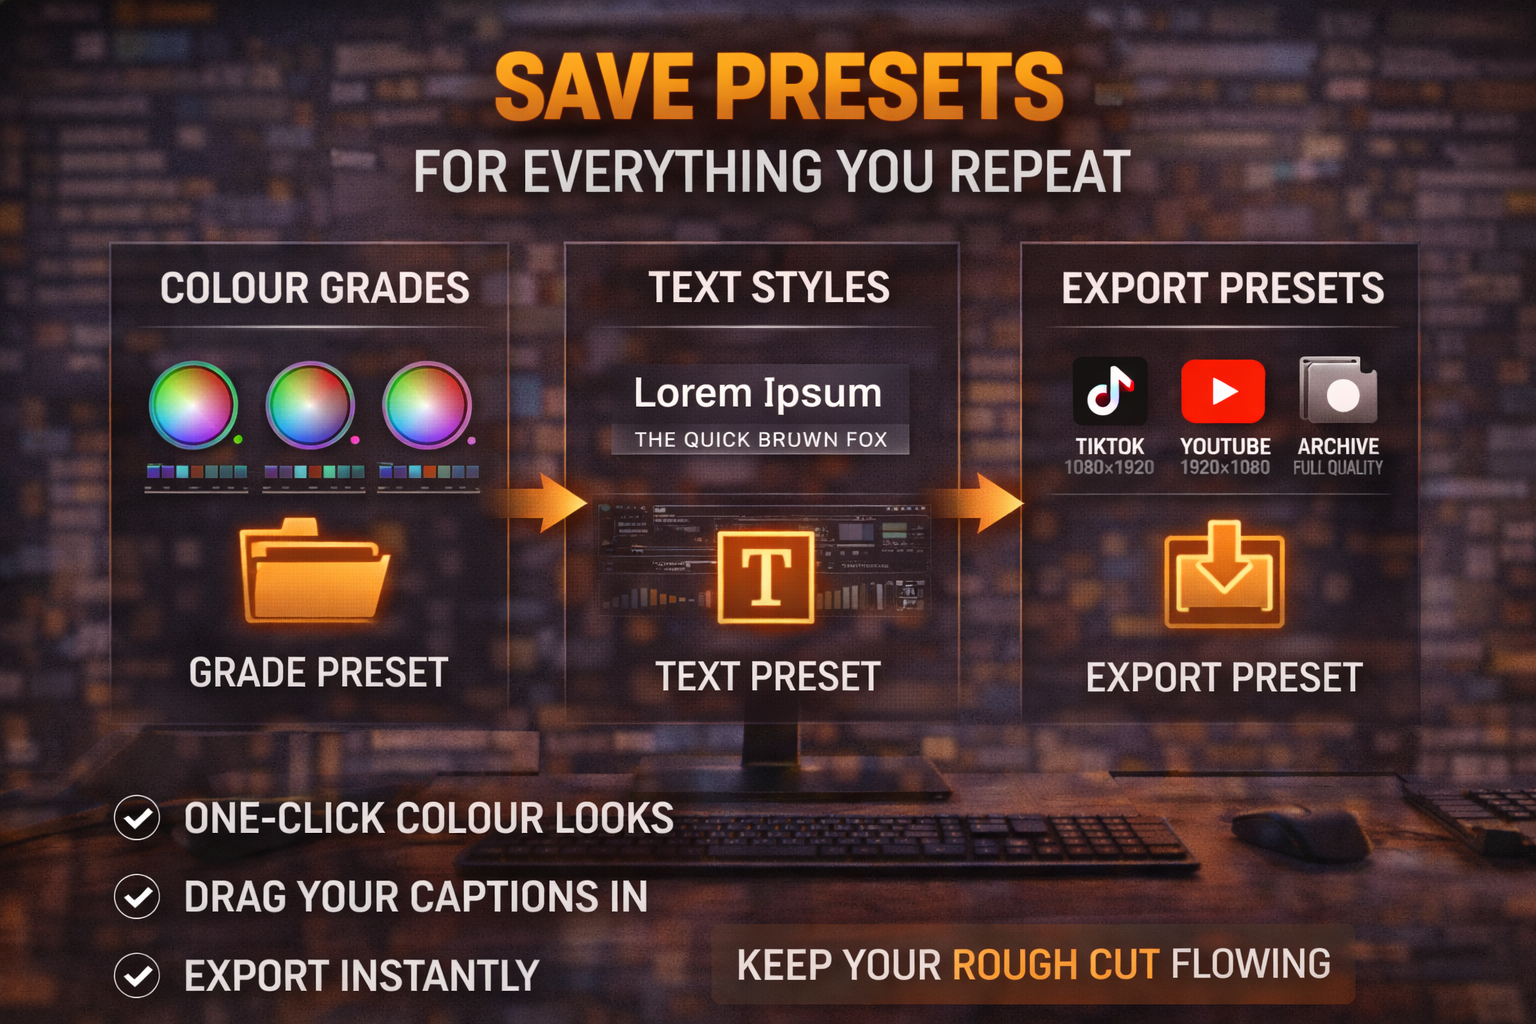
Any time you adjust the same setting more than twice, it should be a preset.
Colour grades: save your base look as a Power Grade in DaVinci (right-click a still in the Gallery → Save as Power Grade) or as a saved LUT/Lumetri preset in Premiere. One click to apply a consistent look instead of rebuilding it. More on building a grade in How to Color Grade a Music Video by Genre →
Text styles: your caption font, size, colour, position. Save as a text preset and drag it in. In Premiere: Effects panel → Presets → right-click to save after styling a text clip.
Audio chains: your standard gain adjustment plus any noise reduction. Save the effect chain as a preset once and apply it across every clip.
Export presets per destination: one preset for TikTok/Reels at 1080 × 1920, one for YouTube at 1920 × 1080, one for archive at full quality. Never dial in export settings from scratch.
Per Adobe's Premiere Pro help documentation, export presets can be saved and shared across projects — worth setting up once properly.
8. Batch edit content at the same time
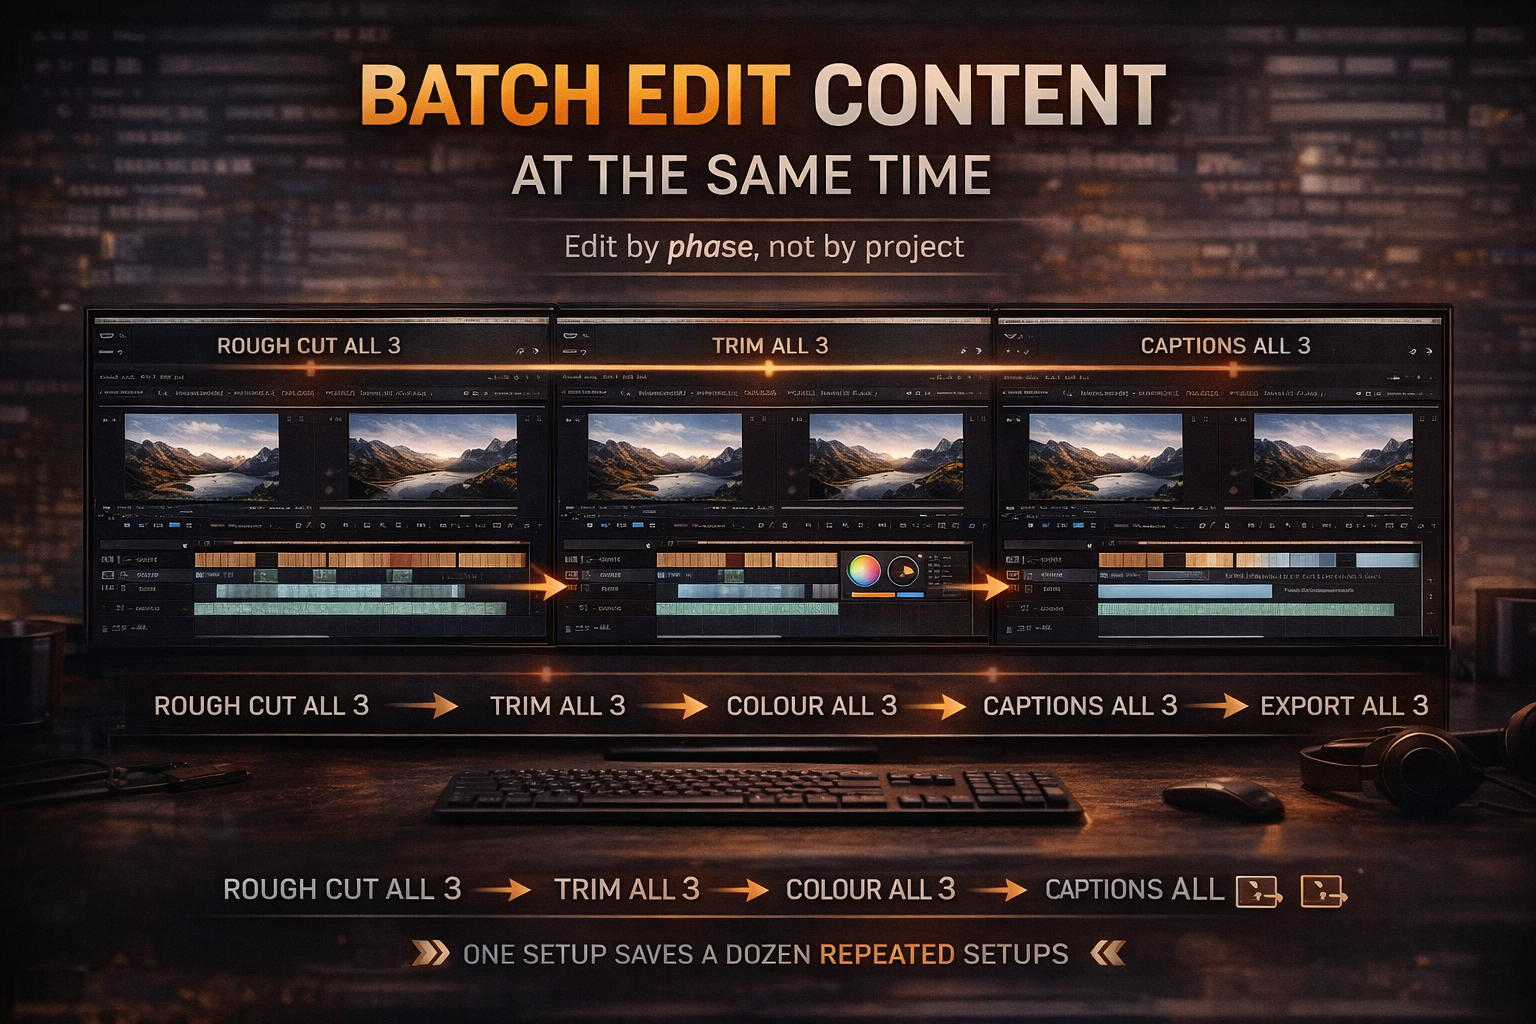
If you post regularly — weekly Reels, recurring short clips, anything with a consistent format — editing one video completely before opening the next one is the slow way to do it.
Batch editing means opening all the projects for the week simultaneously and moving through each phase on all of them at once:
Rough cut all three → trim all three → colour grade all three → captions on all three → export all three.
Every time you switch between tasks there's a startup cost — reloading context, remembering where you were, shifting mental gears. Batching removes most of those transitions. You're in rough-cut mode for two hours straight rather than switching modes six times.
It's also faster for the machine. Rendering three exports back to back while you do something else is faster than returning to each one separately across three separate sessions.
9. Work from an external SSD
Editing from an internal laptop drive creates read/write bottlenecks that show up as lag, dropped frames, and slow scrubbing — especially on large 4K files. This is particularly obvious when the software is also running on the same drive.
An external SSD connected via USB-C or Thunderbolt reads and writes fast enough that it doesn't create those bottlenecks. A spinning HDD doesn't. If you're working from an HDD and wondering why the software feels sluggish even on a capable machine, that's likely the reason.
Practical setup: footage and project files on the external SSD, system and software on the internal drive. The machine isn't competing with itself for drive access.
For 1080p editing, almost any USB-C SSD from a reliable brand in the 500GB–1TB range works. For 4K without proxies, Thunderbolt speeds make a more noticeable difference.
10. Know when to stop
The slowest part of most edits isn't the work itself. It's the extra forty minutes of second-guessing decisions you already made correctly twenty minutes ago.
The edit is done when the structure is right, the pacing works, and the technical problems are fixed. It is not done when it's perfect, because "perfect" is a direction, not a destination.
One approach that works: set a time limit for the refinement pass before you start it. Thirty minutes to polish. When that time is up, export. The things you would have changed in minute thirty-five are almost never things the viewer notices.
The editors who output consistently aren't faster at any individual part of the process. They're faster at deciding they're done.
FAQ
Do these work in CapCut as well as Premiere or DaVinci? Most of them — proxies, markers, passes, presets, batch editing, external SSD all apply regardless of software. Keyboard shortcuts are the most software-specific, but the J-K-L logic exists in CapCut desktop as well. The principle of learning whatever your editor's equivalents are applies everywhere.
What's the single biggest time saver if you're starting out? Passes. Most new editors try to do everything at once and spend the whole session context-switching. Separating the rough cut from the trim pass from the polish pass requires no new tools or shortcuts and cuts edit time noticeably on the first try.
How much time can you realistically save? Depends entirely on what you're currently doing. When I shifted to batch editing and stopped working in a single continuous pass, edit time on a typical short-form clip dropped from around ninety minutes to around forty. The number is specific to my setup. The direction is universal — every one of these hacks moves the same way.
Does faster editing mean worse editing? Only if faster means skipping the refinement stage. These hacks remove the parts that don't contribute to quality — the searching, the rebuilding, the machine lag, the mental gear-shifting. Cutting those doesn't touch the creative work.
How long should video editing take? A 60-second Reel typically takes 45–90 minutes including colour and captions. A 3–5 minute music video with synced cuts takes 3–6 hours depending on how much footage you're sorting through. If you're consistently going over those ranges, the problem is almost always one of the things above — no proxies, no presets, or no structure to the session.
How do I edit videos faster on my phone? Most of what applies to desktop applies on mobile too. In CapCut mobile: use Auto Captions instead of typing them manually, save text styles as templates, and use the Speed panel to remove dead air in bulk. The biggest mobile time-saver is shooting with the edit in mind — fewer takes, clean audio, nothing unusable to sort through. The clip you don't shoot is the clip you don't have to throw away.
Why is my video editing software so slow? Four most common causes: no proxy files on high-resolution footage, editing from a slow spinning hard drive instead of an SSD, too many effects active during playback, and not enough RAM free. Fix them in that order — proxies alone solve most performance problems without touching anything else.
Most of what applies to desktop applies on mobile too. In CapCut mobile: use Auto Captions instead of typing them manually, save text styles as templates, and use the Speed panel to remove dead air in bulk. The biggest mobile time-saver is shooting with the edit in mind — fewer takes, clean audio, nothing unusable to sort through. The clip you don't shoot is the clip you don't have to throw away.
Why is my video editing software so slow?
Four most common causes: no proxy files on high-resolution footage, editing from a slow spinning hard drive instead of an SSD, too many effects active during playback, and not enough RAM free. Fix them in that order — proxies solve most performance problems without touching anything else.