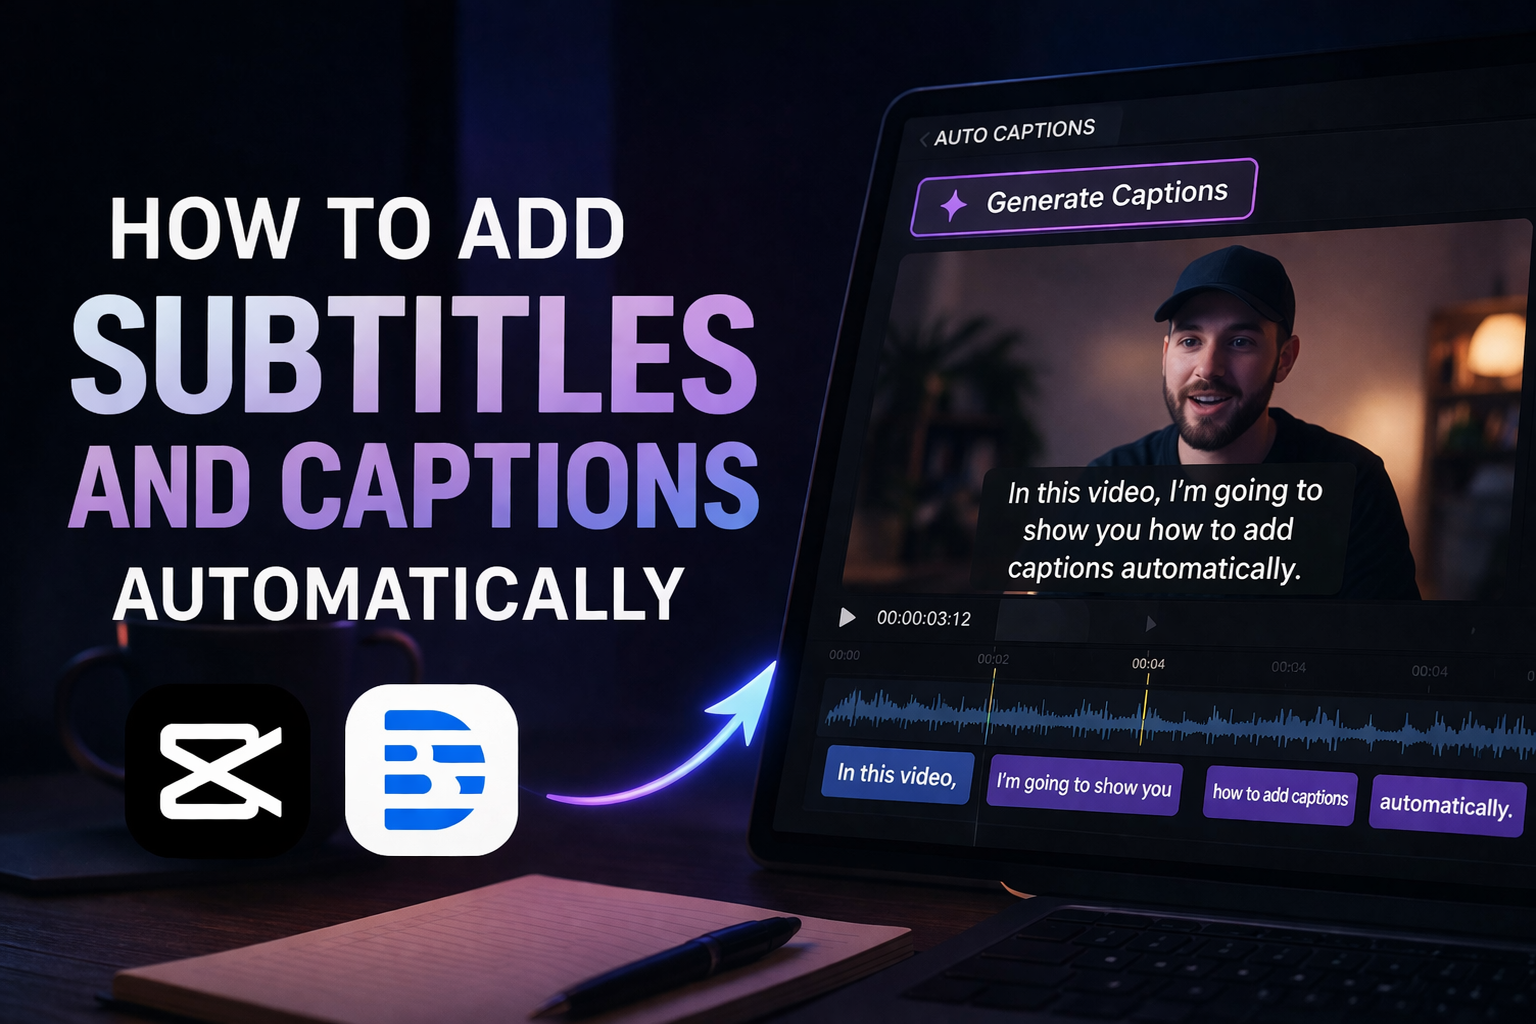
How to Add Subtitles and Captions Automatically
Most short-form video is watched without sound — on Facebook the figure has been cited at 85%, and the pattern holds across TikTok and Instagram Reels too. A significant portion of your audience will never hear what you say. They'll read it, or they'll keep scrolling.
Captions fix that. They improve viewer retention, help non-native speakers follow along, and make your content accessible to people with hearing impairments. Every major editing tool now has speech-to-text built in or available as a free plugin — CapCut, DaVinci Resolve, and Descript all handle it. The process takes a few minutes per video once you know the workflow.
This guide covers auto subtitle generation in CapCut (mobile, desktop, and web), DaVinci Resolve Studio, the free version of DaVinci with AutoSubs, and Descript. The styling section at the end applies to all of them.
Subtitles vs captions — the actual difference
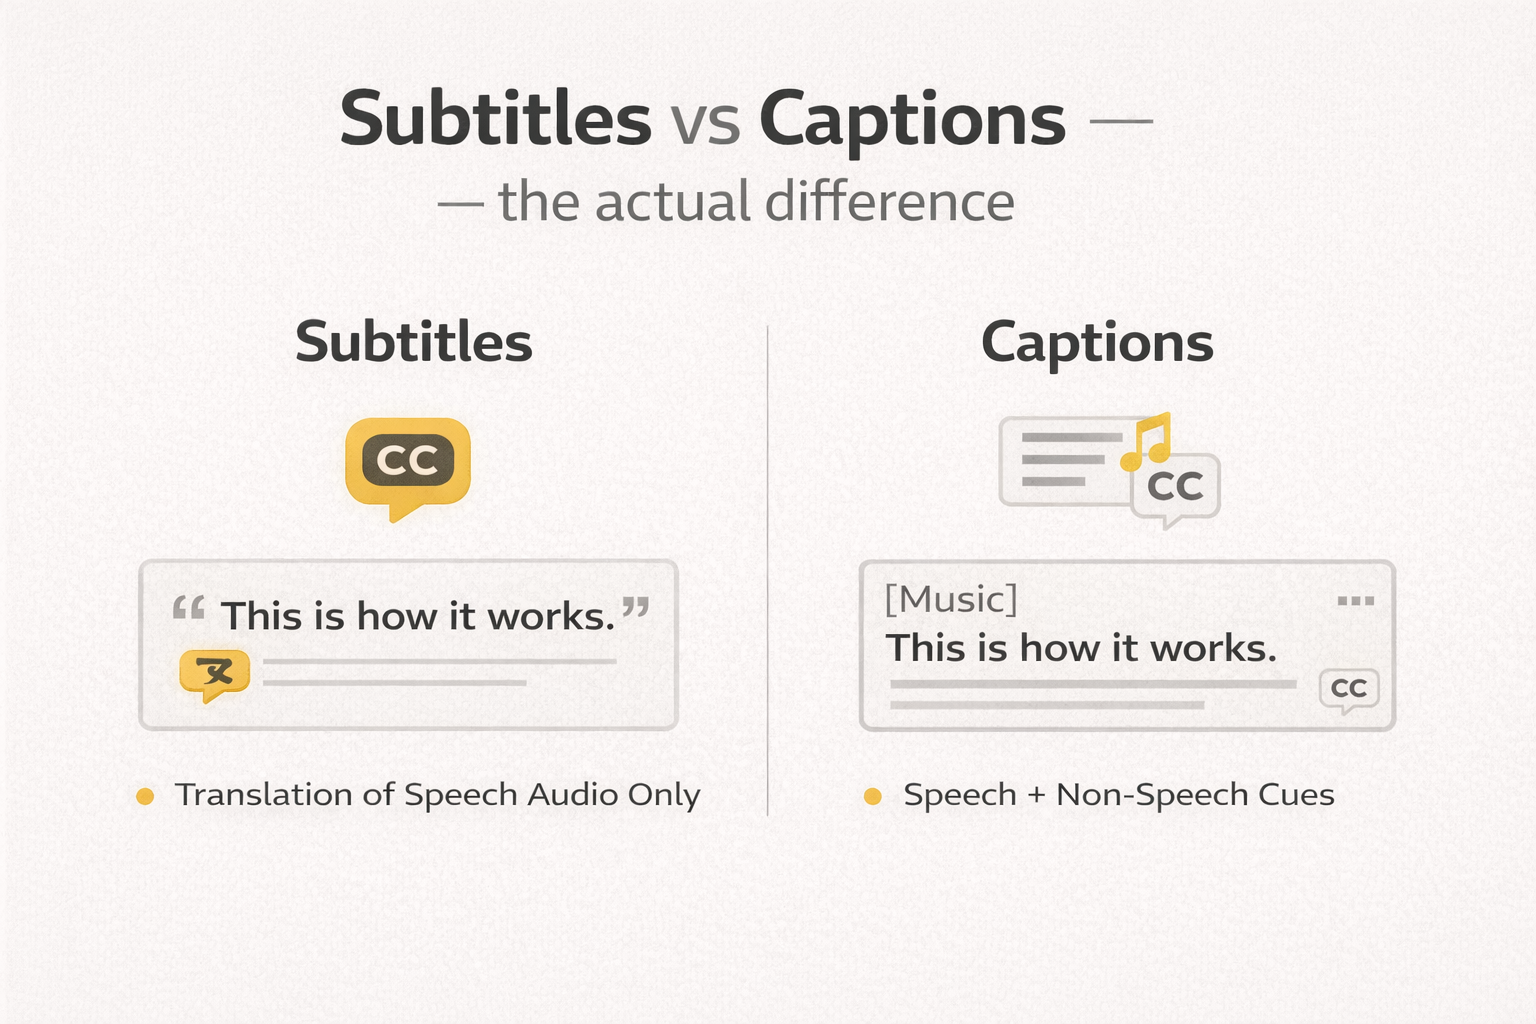
People use these words interchangeably, and for most short-form content that's fine. But the distinction matters when accessibility is the goal.
Subtitles show spoken dialogue only. They're aimed at viewers who can hear but are watching in a second language, or who missed a word.
Closed captions include everything: dialogue, sound effects, speaker labels, significant background audio. They're designed for viewers who can't hear the audio at all.
For TikTok, Reels, and Shorts, the practical difference is usually small. What matters is that the text is accurate, well-timed, and readable.
Open captions (also called burned-in or hardcoded subtitles) are baked directly into the video frame and can't be turned off. Closed captions exist as a separate caption file — an SRT or VTT — that viewers can toggle. TikTok and Instagram Reels don't support external caption files, so burned-in captions are the standard for those platforms. YouTube and Vimeo support SRT files uploaded separately, which is the better option there — more on that at the end.
CapCut — mobile, desktop, and web
CapCut's auto caption workflow runs on the same speech-to-text engine across all three versions. It's free, produces decent accuracy on clear audio, and exports burned-in captions or an SRT file depending on the version.
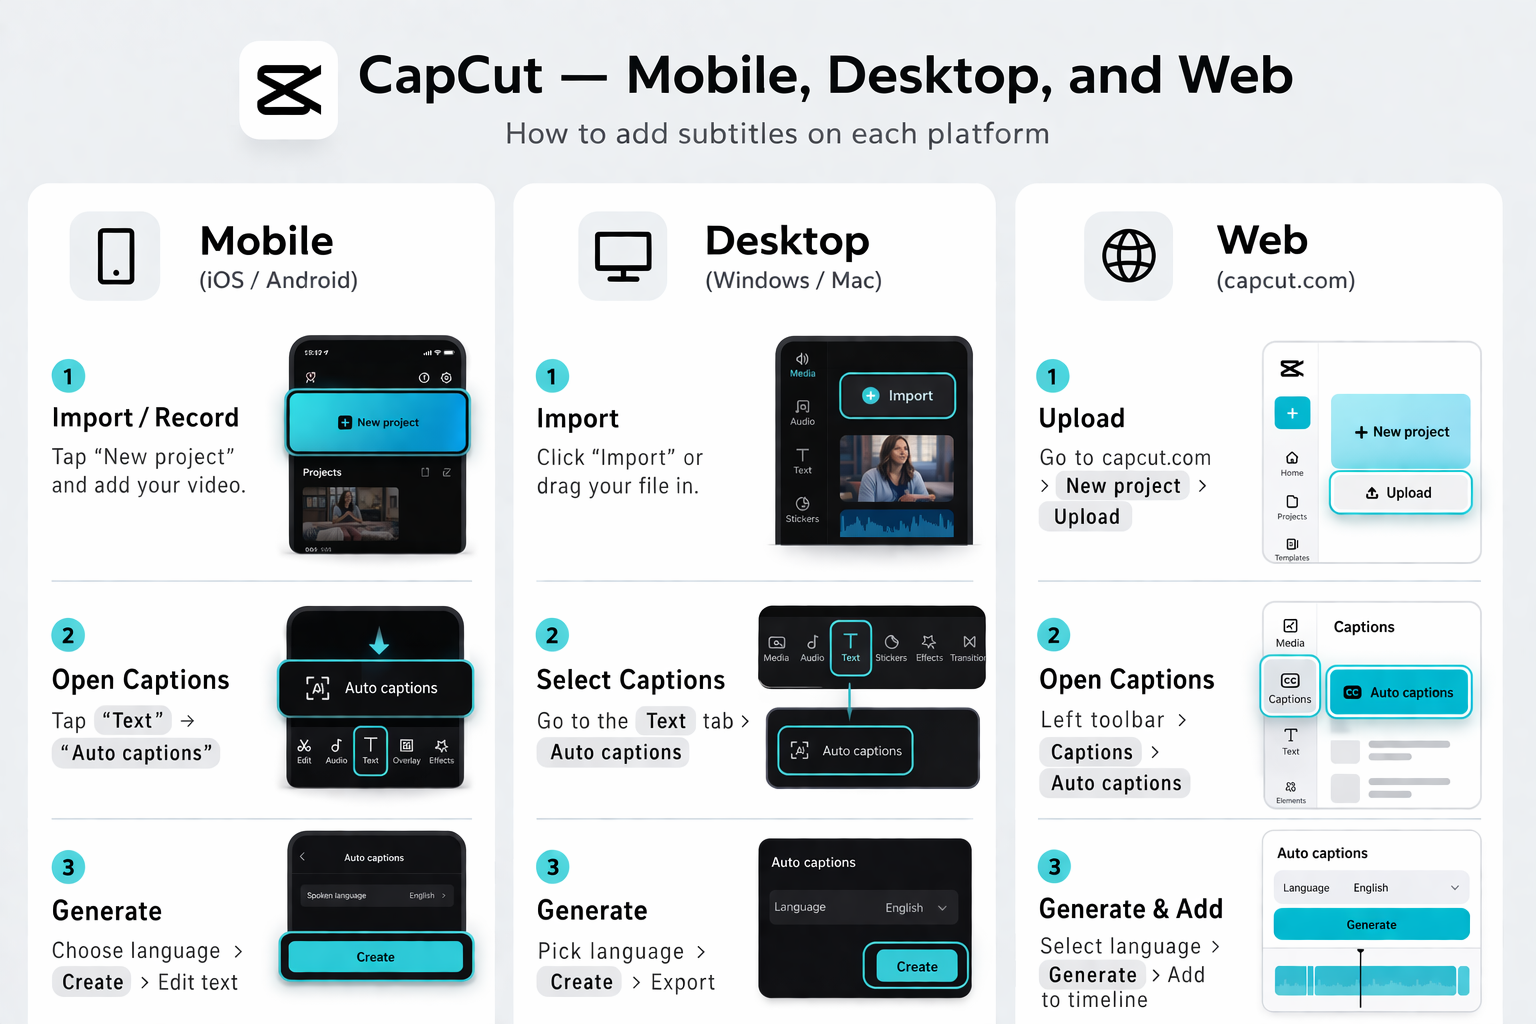
Mobile (iOS and Android)
- Open CapCut → New Project → select your video → Add
- Bottom toolbar → Text → Auto Captions
- Select the spoken language from the dropdown. Don't leave it on auto-detect if you know what you filmed in — the wrong language produces garbled output.
- Tap Start. CapCut transcribes the audio via speech-to-text and places caption blocks on the timeline, synced to speech.
- Tap any caption block to edit text, drag the edges to adjust timing, and change font, size, colour, and animation in the style panel.
- Export as normal. Captions are burned into the video.
Desktop
- Open CapCut Desktop → new project → import footage to the timeline
- Text tab (top menu) → Auto Captions (left panel) → select language → Create
- Processing takes one to three minutes depending on clip length
- Caption clips appear on a dedicated subtitle track below the video. Click any to edit.
- To apply consistent styling across all captions: select all caption clips (Cmd+A / Ctrl+A with the subtitle track active) → adjust font, size, and colour in the Inspector panel
Web
- capcut.com → editor → upload your video
- Captions tab (left toolbar) → Auto Captions → select language → Generate
- After generation, switch to the Styles tab for animated presets — word-highlight and glow styles work well for short-form content
- To export an SRT file for uploading to YouTube separately: three-dot menu on the caption track → Export SRT
What to check after generation: Names, brand names, and technical terms. CapCut's speech-to-text handles everyday speech well but struggles with proper nouns. One pass through the captions at normal speed with audio on catches most errors quickly.
DaVinci Resolve Studio — built-in speech-to-text
DaVinci Resolve Studio (the paid version, $295 one-time) has native auto subtitle generation built in since version 18.5. It produces a dedicated subtitle track directly in the timeline without needing any additional plugin.
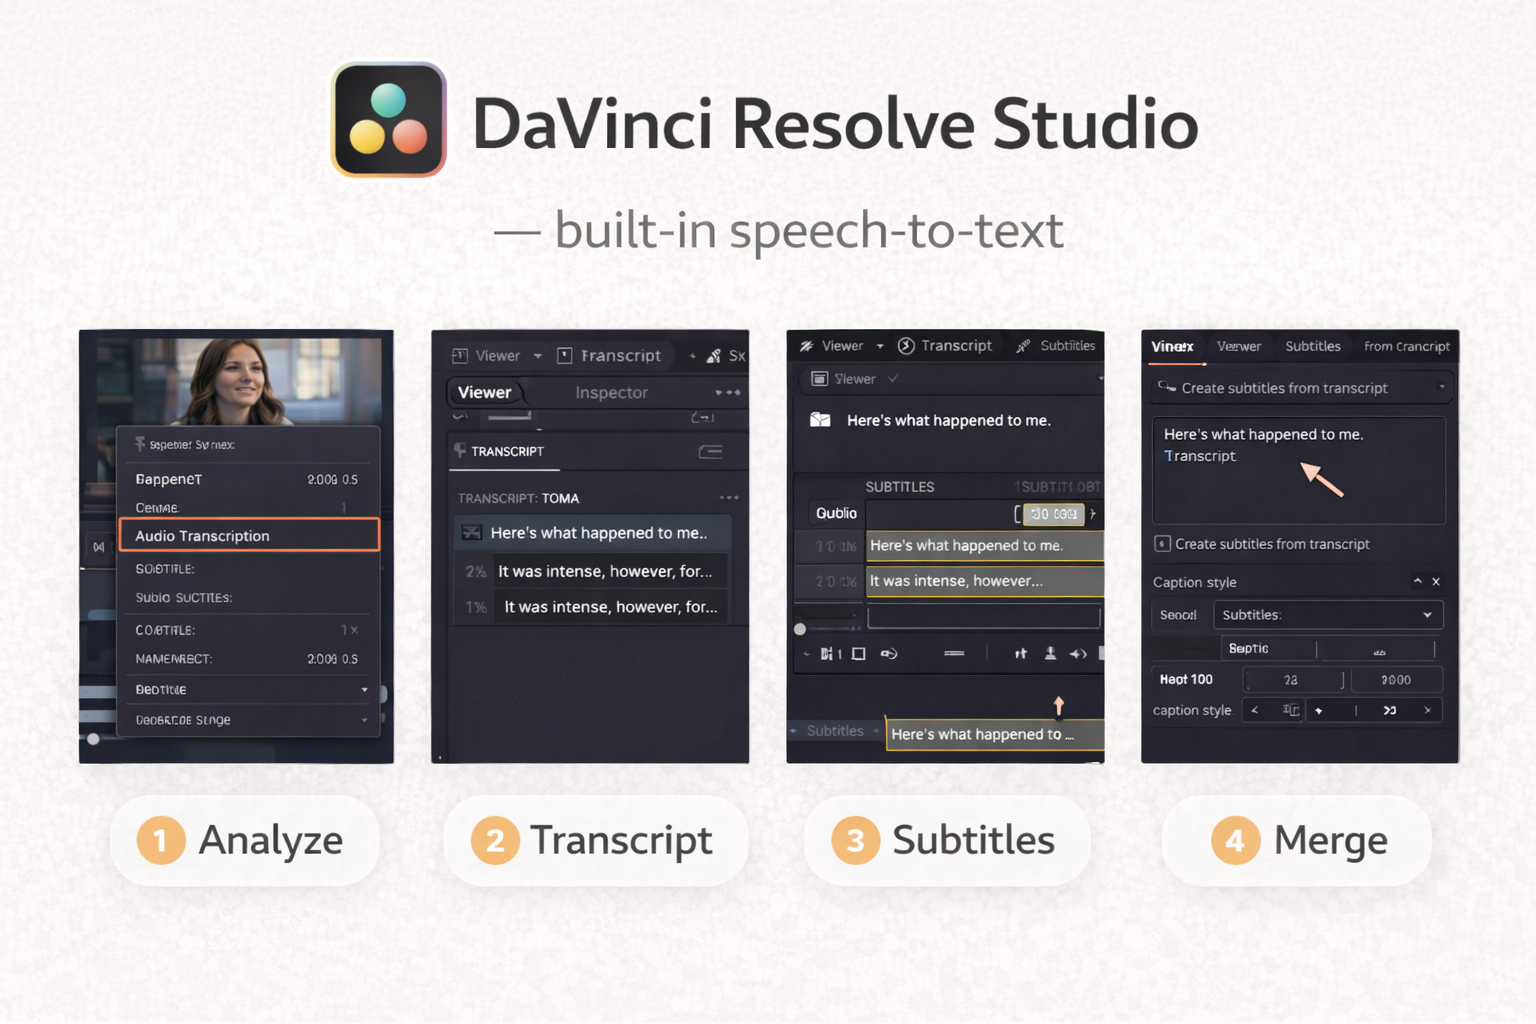
- Open your project. Make sure dialogue is clean — background music competing with speech reduces speech-to-text accuracy significantly.
- Timeline menu → Create Subtitles from Audio
- Set the language. Choose a style preset — DaVinci includes presets formatted to Netflix and broadcast standards, which is a practical starting point.
- Click Create. DaVinci processes the audio and generates a subtitle track. Typically two to four minutes for a standard interview or voiceover clip.
- Click any subtitle block to edit in the Inspector panel. To style the entire track: select the track header → open Inspector → adjust font, size, colour, background, and position. Changes apply to all blocks.
- On the Deliver page: choose Burn into Video (for TikTok, Reels) or Export as SRT (for YouTube) under Subtitle Settings.
DaVinci Resolve free version — AutoSubs plugin
The free version of DaVinci Resolve has no built-in speech-to-text. The most reliable free solution is AutoSubs, an open-source auto subtitle generator that runs AI transcription locally using OpenAI's Whisper model. No subscription, no cloud upload, no cost.
Download from github.com/tmoroney/auto-subs. Installers exist for Windows and macOS. One important note: it won't work with the Mac App Store version of DaVinci Resolve — if that's your install, download DaVinci directly from Blackmagic's website instead.
- Open DaVinci Resolve → load your project
- Workspace → Scripts → AutoSubs
- Select your audio track from the dropdown. Leave the transcription model on the default Whisper setting for most videos.
- Click Transcribe. The plugin processes audio locally — nothing leaves your machine. Processing time depends on clip length and your hardware.
- When done: Export → save as SRT file
- Back in DaVinci: File → Import → Subtitle → select the SRT
- A subtitle track appears on the timeline. Edit and style from there normally.
The output quality is comparable to DaVinci Studio's built-in tool. The extra steps are worth it if you're on the free version.
Descript — editing by video transcript
Descript works differently from the other tools here. It transcribes your video on import and makes the video transcript the primary editing interface. You delete words from the transcript and the video edits automatically.
This makes it particularly useful when you're editing and captioning at the same time, or pulling short clips from a longer interview — you can read the exact words spoken before deciding where to cut.
- Create a project → import your video. Speech-to-text transcription runs automatically on upload, usually two to three minutes for a ten-minute clip.
- Read through the video transcript. Click any word to jump to that point in the video. Delete text to remove it from both transcript and video simultaneously.
- Descript catches filler words ("um", "uh", extended pauses) and lets you remove them in bulk — useful before generating captions so they don't appear in the final text.
- Publish → Captions → choose burned-in or export SRT. Style options are in the captions panel.
The free tier allows limited transcription minutes per month. Regular use needs the paid plan.
Styling captions that actually work
Generated captions are accurate but not always readable. A few decisions affect whether viewers actually follow them.
Font and weight. Bold or semi-bold sans-serif fonts hold up best at small sizes and against varied backgrounds. Thin or decorative fonts become illegible on busy footage. CapCut's default bold style is a reasonable starting point for most content.
Contrast. White text on a light background disappears. Add a dark outline (1–2px) or a semi-transparent background bar behind the text. This is the most common caption problem on outdoor or mixed-background footage — a bright sky makes white text invisible. Hardcoded subtitles have no viewer override, so contrast has to be built in.
Size. For vertical video at 9:16, caption text should be large enough to read on a phone screen without zooming. Too small and they get ignored. Too large and they cover important visual content.
Safe zone. Keep captions away from the very bottom of the frame on TikTok and Reels. UI elements — buttons, usernames, the caption bar itself — overlap that area and your text disappears behind them. Position captions roughly 15–20% up from the bottom edge.
Line length and timing. Break captions at natural speech pauses — between clauses, not mid-phrase. Each caption block should stay on screen long enough to read comfortably. Aim for two to five seconds per block as a baseline; fast speech may need shorter blocks, slower speech can support longer ones.
Check with sound off. Before exporting, watch the full video with audio muted. This is how a significant part of your audience will see it. If something is confusing without sound, the caption needs to be clearer or better timed. Viewer retention on short clips increases when captions let the audience follow content on mute — they stay rather than scrolling past.
Exporting SRT files for YouTube and Vimeo
If you're uploading to YouTube, exporting a separate SRT caption file is better than burning captions into the video. YouTube indexes the caption text for search, allows viewers to toggle captions on and off, and can auto-translate to other languages using the uploaded transcript as a base.
An SRT file looks like this:
1
00:00:02,400 --> 00:00:04,800
Most short-form video is watched without sound.

2
00:00:05,100 --> 00:00:07,600
Captions fix that.
To upload: YouTube Studio → select the video → Subtitles → Add → Upload file → select your SRT.
CapCut Web, DaVinci Resolve Studio, and Descript all export SRT directly. For DaVinci free with AutoSubs, the SRT is the direct output of the plugin.
FAQ
How accurate are auto-captions? For clear speech in a quiet environment, accuracy is typically 90–95% with CapCut and DaVinci's speech-to-text. Background music, strong accents, and fast speech reduce this. Always review before publishing — errors on screen look unprofessional and can change the meaning of what was said.
Do I need captions if I'm posting music videos with no dialogue? Not for dialogue you don't have. But adding a spoken or text introduction gives the auto subtitle generator something to work with, and even a brief context line improves accessibility and engagement on platforms where audio autoplay is off by default.
Which platform needs burned-in captions vs SRT upload? Burned-in (hardcoded subtitles): TikTok, Instagram Reels, Facebook Reels. SRT upload supported: YouTube, Vimeo, LinkedIn, Facebook video (non-Reels).
What's the difference between SRT and VTT files? Both are plain-text caption file formats with timestamps. SRT is more universally supported — YouTube, Vimeo, and LinkedIn all accept it without issues. VTT (WebVTT) is the web standard and supports additional styling options. For most creators, SRT is the safer default.
Can I edit the auto-generated captions after exporting? Yes. An SRT file is a plain text file — open it in any text editor and edit the lines directly. Timing is in the format HH:MM:SS,milliseconds --> HH:MM:SS,milliseconds.
Do captions help with SEO? On YouTube, directly — Google indexes the caption text and it contributes to how the video ranks for relevant search queries. On TikTok and Instagram, the effect is indirect: captions improve viewer retention and completion rate, which the algorithm uses as a ranking signal.