Best Export Settings for TikTok, Reels, and YouTube (2026)

For TikTok, Instagram Reels, and YouTube Shorts: 1080 × 1920, H.264, 10–15 Mbps, Rec. 709, sharpening off. For YouTube long-form at 1080p: 1920 × 1080, H.264, 8 Mbps. For 4K YouTube: 35–45 Mbps. The rest of this article explains why these numbers, and what specifically breaks when you ignore them.
The first music video clip I uploaded to YouTube looked like it was filmed through a wet sock. Same footage, same edit — the export I'd sent to Instagram that morning looked fine. The difference was entirely in the settings. YouTube's compression pipeline is different from Instagram's, and what survives one platform's re-encoding doesn't automatically survive another's.
Every platform recompresses your video on upload. What you control is how much quality you lose in that process.
Quick reference
| Platform | Resolution | Codec | Bitrate | Frame rate | Audio |
|---|---|---|---|---|---|
| TikTok | 1080 × 1920 | H.264 | 10–15 Mbps | Match source | AAC, 192kbps, 48kHz |
| Instagram Reels | 1080 × 1920 | H.264 | 10–15 Mbps | 30fps | AAC, 192kbps, 48kHz |
| YouTube Shorts | 1080 × 1920 | H.264 | 10–15 Mbps | Match source | AAC, 192kbps, 48kHz |
| YouTube 1080p | 1920 × 1080 | H.264 | 8 Mbps @ 30fps | Match source | AAC, 320kbps, 48kHz |
| YouTube 4K | 3840 × 2160 | H.264/H.265 | 35–45 Mbps @ 30fps | Match source | AAC, 320kbps, 48kHz |
TikTok
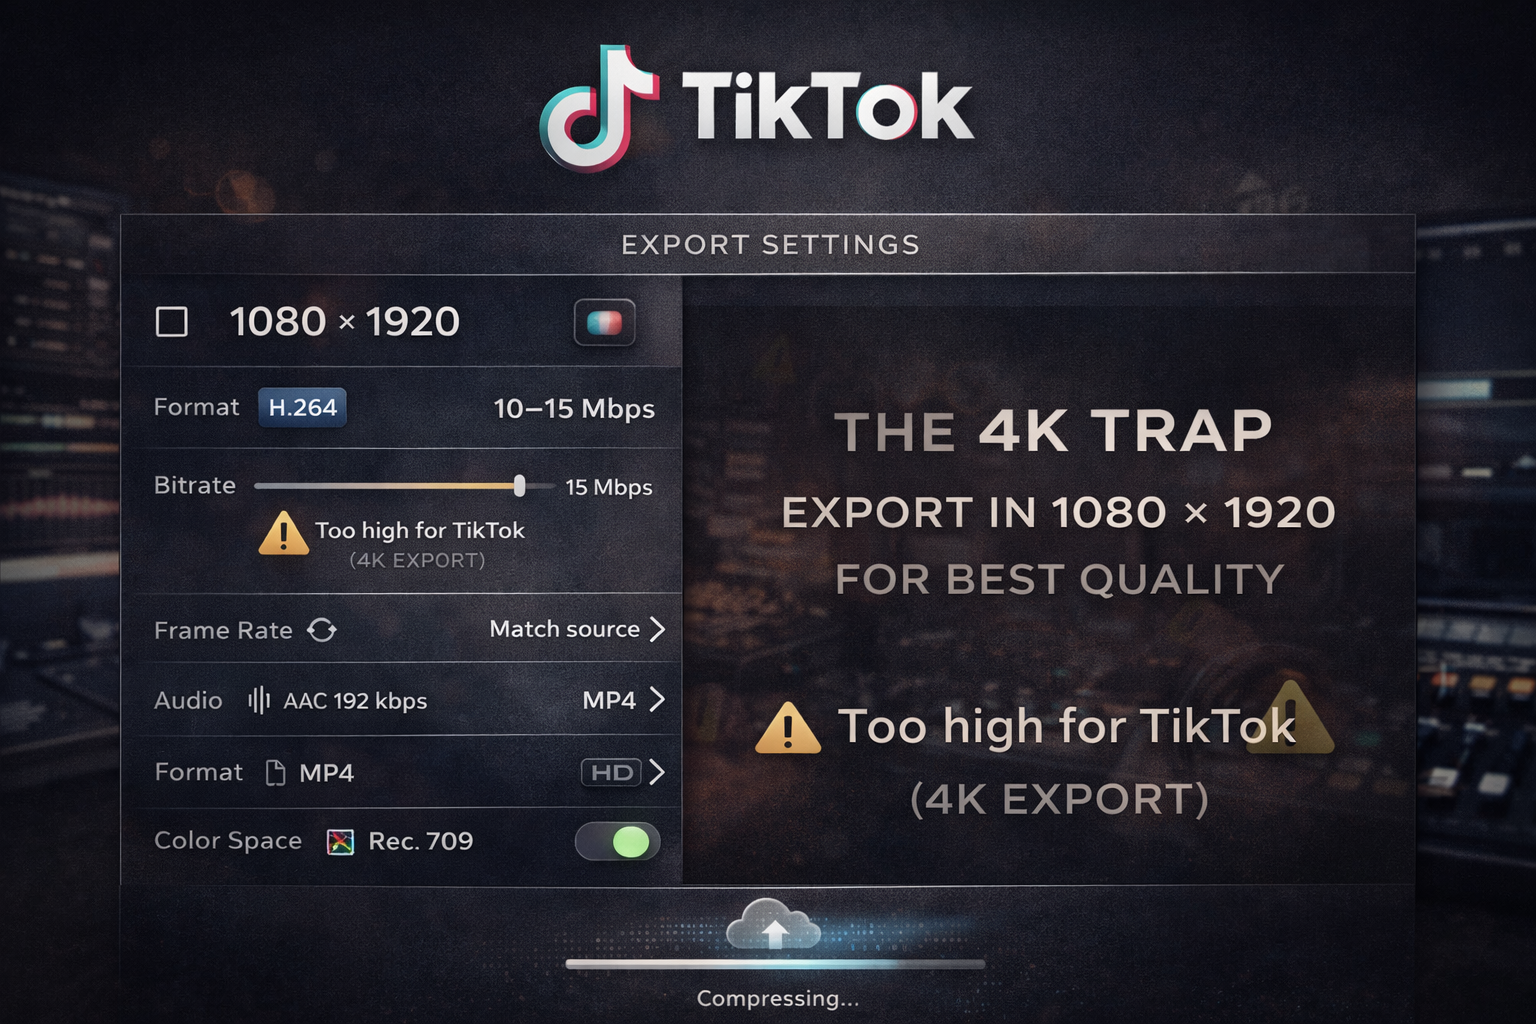
1080 × 1920 · H.264 · 10–15 Mbps · Match source fps · AAC 192kbps · MP4 · Rec. 709
TikTok compresses everything on upload. There's a ceiling around 15 Mbps above which it just gets crushed down anyway — exporting at 50 Mbps and at 15 Mbps will look identical after upload. The target isn't "as high as possible". It's 10–15 and not a bit more.
The 4K trap. Uploading 4K to TikTok sounds better but isn't. TikTok's native resolution is 1080p, so 4K gets downscaled by the platform's encoder — that downscale adds compression artifacts you wouldn't have if you exported 1080p directly. Film in 4K if your camera supports it, export at 1080 × 1920.
Color space and sharpening matter more than most creators expect. A DaVinci user on the Blackmagic Design forum described their workflow: restrict to Rec. 709 so colors don't get crushed on upload, set sharpness to zero to avoid double sharpening. TikTok applies its own sharpening pass when it processes your upload. If you've already sharpened in your grade, those edges get processed twice — crunchy on phone screens in a way that's hard to name until you've seen it. I had a clip where this happened and spent twenty minutes thinking the problem was my color grade. It wasn't. The sharpening slider was at 30 percent.
Data Saver resets. App updates on TikTok frequently reset the "Allow High Quality Uploads" toggle without any notification. Before every upload: Settings → Data Saver → off, then when posting → More options → High Quality Uploads → on. Every time. Not once and done.
No watermarks. Export a clean file. TikTok detects CapCut logos and platform branding and reduces distribution on anything that arrives with one.
Per TikTok's creator documentation, recommended upload resolution is 1080 × 1920.
Instagram Reels
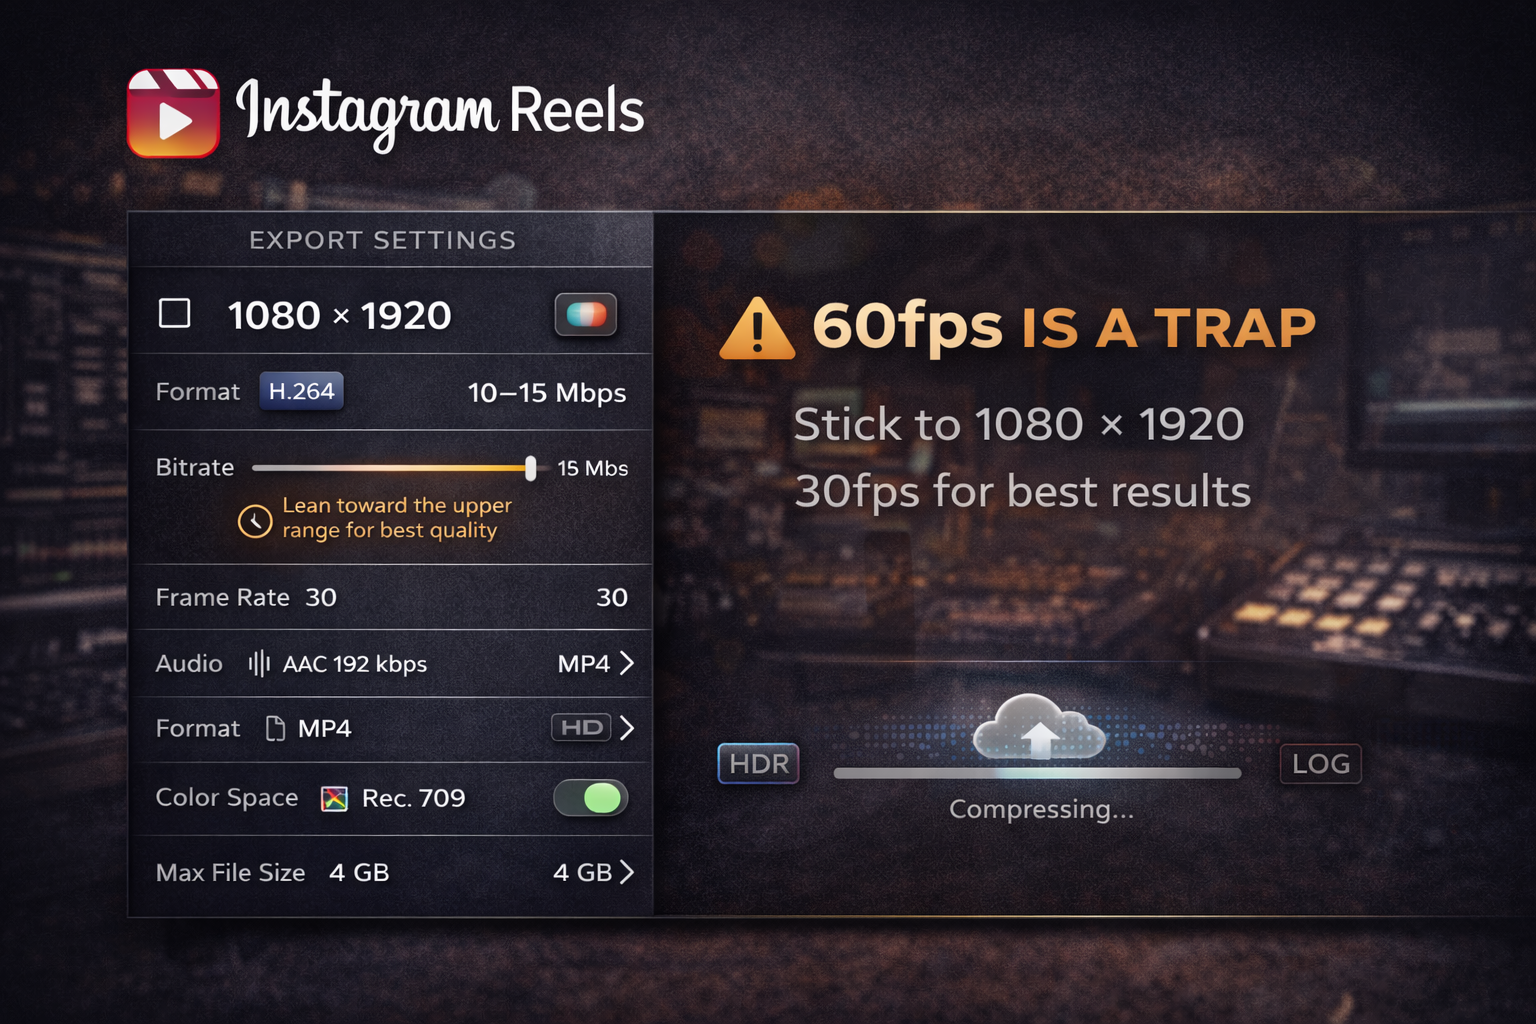
1080 × 1920 · H.264 · 10–15 Mbps · 30fps · AAC 192kbps · MP4 · Rec. 709 · Max 4 GB
A real thread on the Adobe Community forums describes a problem I've also run into: colors looked right in Premiere, desaturated after upload, and the standard Rec. 709 advice made things worse. The cause was iPhone footage with a non-standard color profile that needed explicit conversion before export — not just tagging. If colors shift after upload despite correct settings, check whether your source footage was shot in HDR or LOG and isn't being converted in the export chain.
Instagram's compression on fast motion and busy backgrounds is more aggressive than TikTok's. Music video content — lots of cuts, movement, saturated grades — gets hit hardest. I re-exported the same 47-second clip at 8 Mbps and at 14 Mbps and uploaded both. The 8 Mbps version showed compression artifacts in the hair and text edges. The 14 Mbps version didn't. For music content, lean toward the higher end of the range.
60fps on Instagram is a trap. Editors on drone forums figured this out the hard way: Instagram compresses video files to under 15 MB, and at 60fps the bitrate needed to hold quality makes the file too large to survive that compression cleanly. 30fps. Not 60.
Upload via the app, not Creator Studio. The mobile app's pipeline is less aggressive than the desktop API route. Same file, same settings — noticeably better on motion-heavy sections via the app.
For safe zones and aspect ratios across all platforms: Best Aspect Ratios for Every Platform →
YouTube Shorts
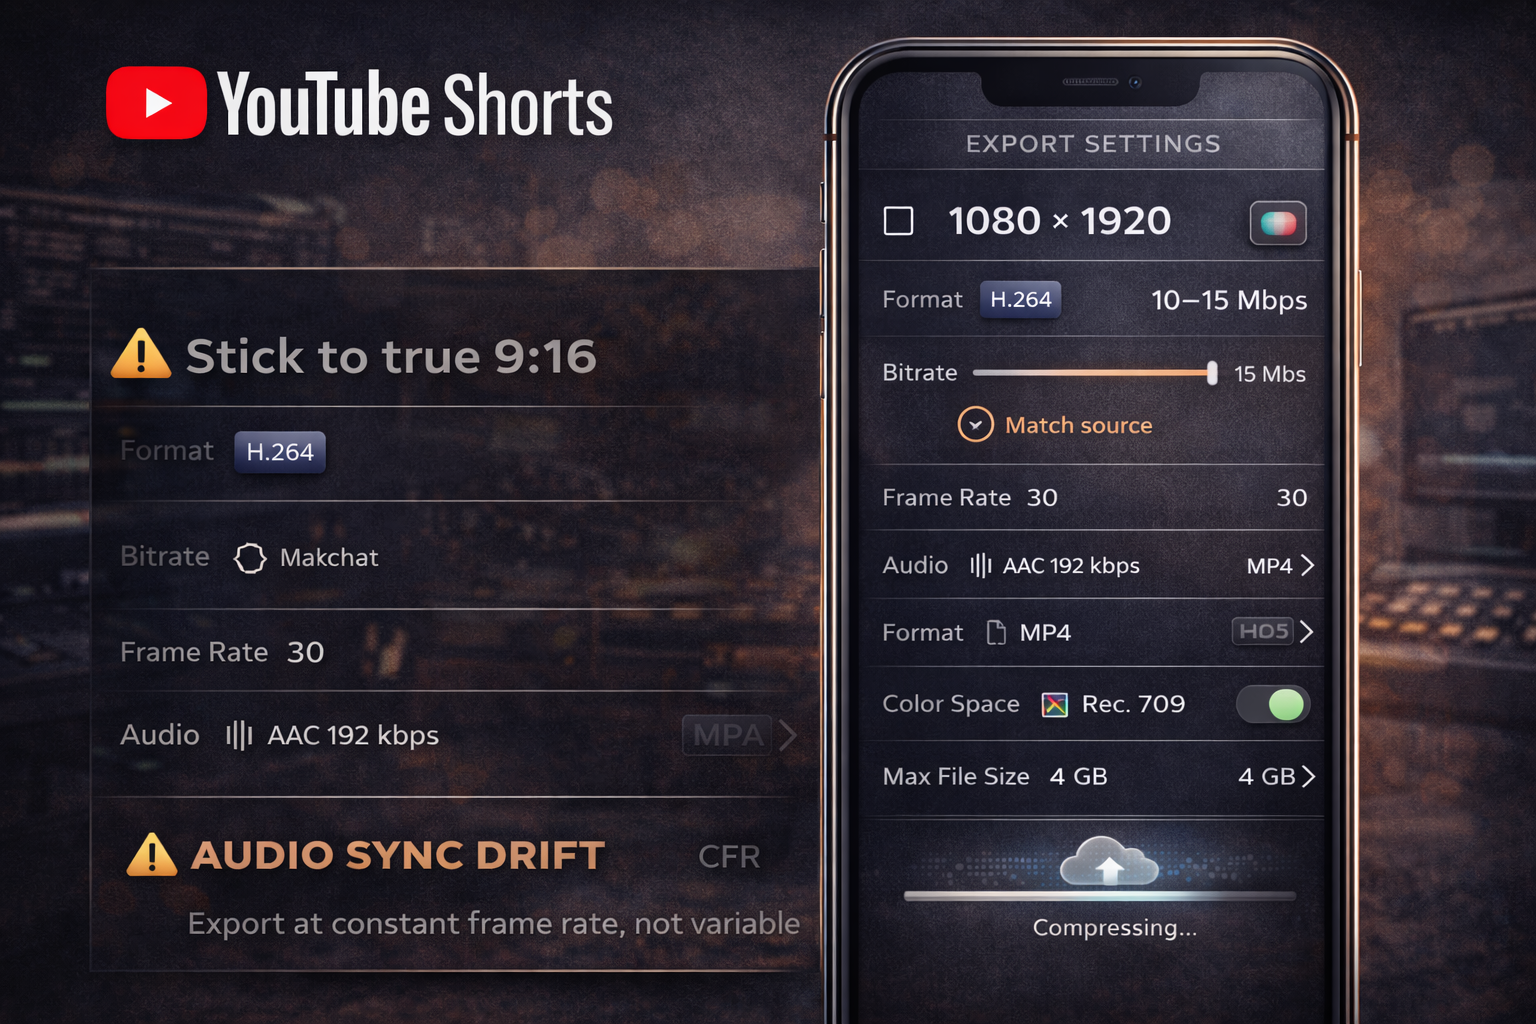
1080 × 1920 · H.264 · 10–15 Mbps · Match source · AAC 192kbps · MP4
YouTube Shorts uses the same vertical format as TikTok and Reels but YouTube's compression pipeline handles files more generously — particularly for accounts with upload history. Settings are identical, the platform just does less damage to what you give it.
Export at exactly 1080 × 1920. Phones and screen recorders sometimes produce non-standard ratios — 9:18 or 9:19.5 — that match the phone screen shape but aren't true 9:16. YouTube crops these on upload, and the crop can clip text you thought was inside the safe zone.
Some phones export at variable frame rate by default rather than constant frame rate. YouTube can produce audio sync drift with VFR files — on one 38-second clip the audio had drifted by 11 frames by the end, enough to notice on a cut-to-beat edit. In DaVinci Resolve: Deliver page → Force constant frame rate. In Premiere: ensure your sequence uses a fixed frame rate before export. This doesn't appear in most export guides and it should.
YouTube long-form

1920 × 1080 min · H.264 · 8 Mbps @ 1080p/30fps · Match source fps · AAC 320kbps · MP4
YouTube's compression is the most sophisticated of any platform here. It serves multiple quality tiers depending on the viewer's connection, which means your source quality matters more than on TikTok or Instagram.
Upload 4K if your footage supports it. YouTube gives 4K uploads a higher-quality encode at all resolutions. The first time I uploaded a music video in 4K and checked it on my 1080p phone, it looked noticeably cleaner than the 1080p-native export I'd been using for the previous six months. Same content, same phone. YouTube allocates more bitrate to the encode when the source is 4K — documented in YouTube's official upload recommendations.
Audio for YouTube long-form: 320 kbps, not 192. Music video content on YouTube has an audience that will listen on decent headphones. The difference between 192 and 320 is audible in a way it isn't on TikTok.
For beat sync and how export frame rate interacts with cut timing: How to Edit a Music Video: Sync Cuts to the Beat →
Export settings by tool
DaVinci Resolve (Deliver page → Custom):
Format: MP4 · Codec: H.264 · Resolution: match platform · Quality: Restrict to 10–15 Mbps for vertical, 35–45 Mbps for 4K YouTube · Frame rate: Same as Timeline · Force constant frame rate: on · Audio: AAC, 48kHz — 192kbps social / 320kbps YouTube · Color space: Rec. 709
I've been using the same Deliver preset for 14 months — set it up once, never touched it again. Right-click the render job → Save as Preset. That's it. One conversation with this menu, then it's just a click per export forever.
Premiere Pro (Cmd+M):
Format: H.264 · Preset: Match Source — High Bitrate, then adjust · Bitrate: VBR 2 Pass, Target 10 Mbps, Max 15 Mbps for vertical · Audio: AAC, 48kHz, 192kbps social / 320kbps YouTube · Color space export: Rec. 709 · Performance: Software Encoding — takes slightly longer to render than Hardware but produces fewer artefacts
Full export reference: Adobe's Premiere Pro documentation.
CapCut desktop:
Resolution: 1080p · Frame rate: 30fps · Bitrate: High · Format: MP4 · AI Ultra HD: Off · Smart HDR: Off
One creator traced consistently lower TikTok reach back to Smart HDR being on in CapCut. The color shift it creates doesn't show in the editor preview — it shows after upload. Turn it off before every export.
Final Cut Pro:
Share → Export File → Format: H.264 · Resolution: match platform · Audio: AAC · Color space: Rec. 709 · For vertical content, set your project to 1080 × 1920 before editing, not after.
The one thing that kills exports
Sharpening.
Every platform applies its own sharpening pass on upload. I noticed it on 3 separate clips before tracing it back to the sharpening slider — the result looks subtly wrong in a way that blends into "maybe it's the compression" until you check the export chain. Export with sharpening at zero. DaVinci's sharpening in the Color page, Premiere's Unsharp Mask, CapCut's Sharpen slider. All the way down. Let the platform do its pass.
The artifact: halos around hair, text that looks slightly embossed, faces that look off in a way you can't name until you've seen it labelled. It's not a bitrate problem. It's a double-processing problem, and the fix is a single slider.
FAQ
Why does my video look blurry after uploading even with good export settings? In order: wrong color space (not Rec. 709), variable frame rate in the source, too much pre-sharpening, or uploading a file that's already been compressed once — TikTok or Instagram downloads, screen recordings, files sent through messaging apps. Always start from your original edit file, not a re-download.
Should I export at the highest possible bitrate? No. There's a ceiling on what each platform preserves. Above 15–20 Mbps for TikTok and Reels, everything gets crushed back down anyway. Higher bitrate means a larger file and slower upload for no visible benefit after the platform recompresses.
What's the best format — MP4 or MOV? MP4 for everything. MOV works but produces larger files and has more edge-case compatibility issues across platforms. H.264 inside MP4 is what every platform processes most reliably.
Should I use H.264 or H.265? H.264 for everything except 4K YouTube. H.265 is more efficient at 4K but causes upload errors on TikTok and Instagram more often than H.264, and has broader device compatibility issues. Not worth the risk for social content.
Do export settings differ for music videos specifically? Same settings — but music video content stresses compression harder than talking-head content. Fast cuts, saturated grades, motion, and grain in dark backgrounds are exactly the conditions where compression artifacts show most. For music content: upper end of the bitrate range (15 Mbps for vertical, 45 Mbps for 4K YouTube), sharpening fully off, and check the result specifically on a phone in the motion-heavy sections.
How do I stop colors shifting after upload? Tag your export as Rec. 709. In DaVinci: Deliver page → Color space tag. In Premiere: verify your footage color space in Lumetri Color. In CapCut: Smart HDR off. If the shift persists despite correct tagging, the source footage is likely in HDR or LOG and isn't being converted in the export chain — just tagged.
Does uploading via app vs desktop make a difference? For Instagram: yes, noticeably — the mobile app compresses less aggressively than Creator Studio or third-party schedulers. For TikTok: upload via web for the highest file size limit (10 GB vs 287.6 MB mobile). For YouTube: minimal difference.
How do I export from CapCut mobile for TikTok? Resolution: 1080p · Frame rate: 30fps · Bitrate: High · Format: MP4 · Smart HDR: off. After export, check that the file has no CapCut watermark before uploading to TikTok.